Featured Products
Sandi Bradshaw is back this week to show you some of her tricks and tips for post processing. Then tomorrow I will use her SOOC shot and show you a few plays of my own in the Friday Blueprint. And next week I will have a tutorial showing how to add fake sky where there is a blown out sky. So check back for these two follow up posts.
Post Processing (Senior Style)
It’s been a few weeks since I’ve done a guest blog post here at MCP Actions, but I hope that this post is worth the wait! My schedule has been a little frantic the past few weeks, but now that things have slowed to normal pace I have been able to put together a post processing tutorial that I hope will give you some new PS tools to play with as well as give you some new tips to take your processing up a notch or two. I’ve chosen a very average image, with some obvious problems to work on because I believe that it will be the most helpful for showing several different processing techniques all in one image.
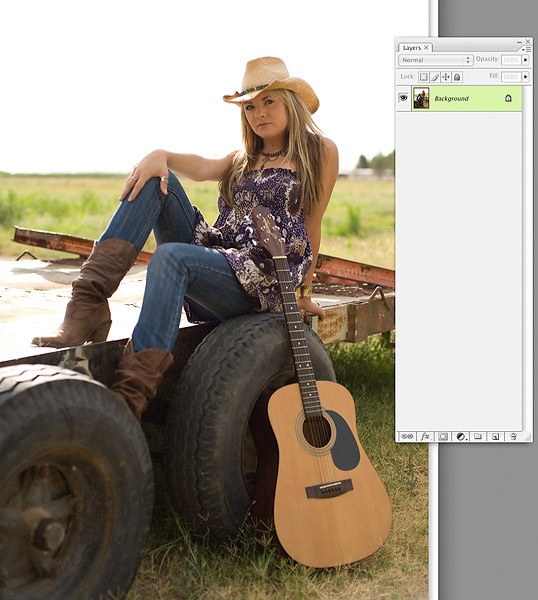
The image has potential, but there are some very obvious problems initially. It is underexposed a bit, it is flat in color and tone, and there is a very strong yellow/orange cast over the whole image partially due to the time of day it was shot and partially due to the underexposure. So, let’s get started…
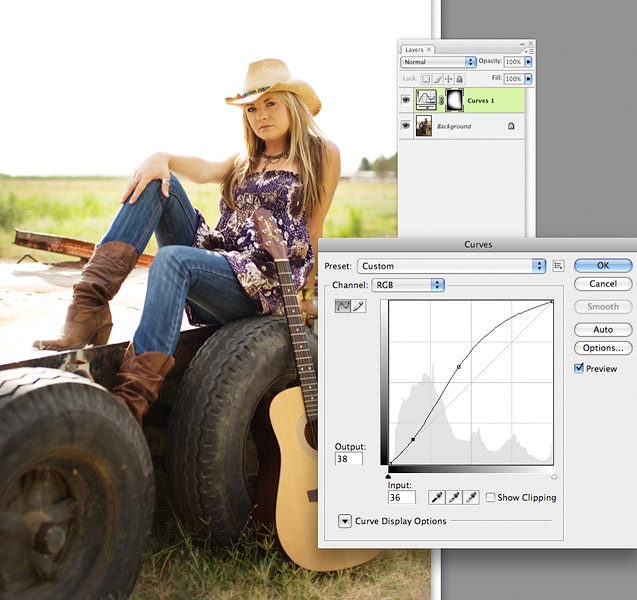
The first thing I’m going to do is open up the shadows on my subject by lasso selecting her at about 200px and bringing up my midtone curves as shown. On your image you will need to play around with the curve a bit to find the spot where you are happy with the amount of detail remaining in the shadows as well as the amount of overall brightness in the midtones. Once I’ve completed this step I flatten my image and duplicate my layer (command + J).
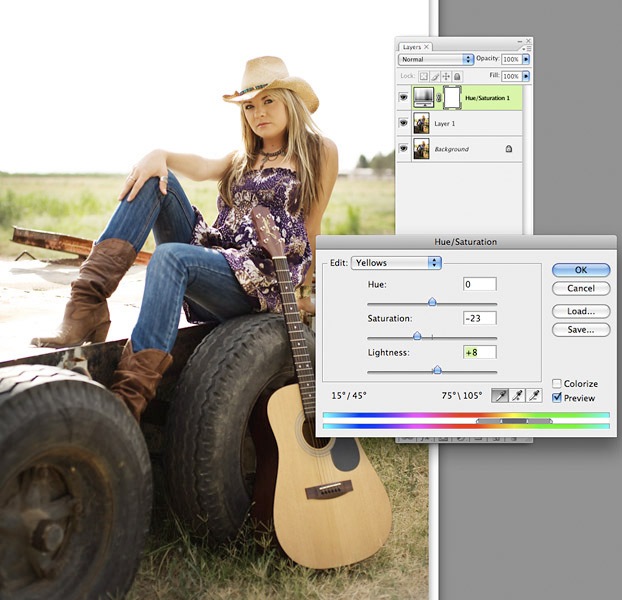
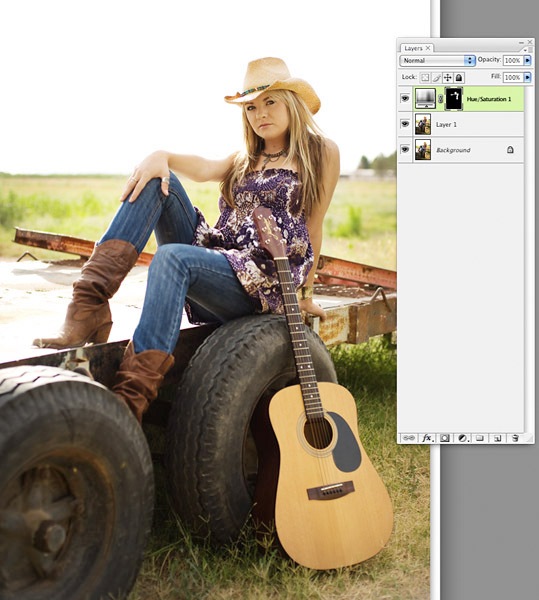
Next I’m going to create a Hue Saturation adjustment layer to bring down the yellows and reds. My settings for the yellows are above…the reds only needed a minor de-saturation adjustment on the slider.
Once I’ve clicked “OK”, I am going to invert my layer mask and then paint back in the areas of her skin where I want the adjustment layer to show through at 100% opacity as shown above. Then I will once again flatten and duplicate my background layer.
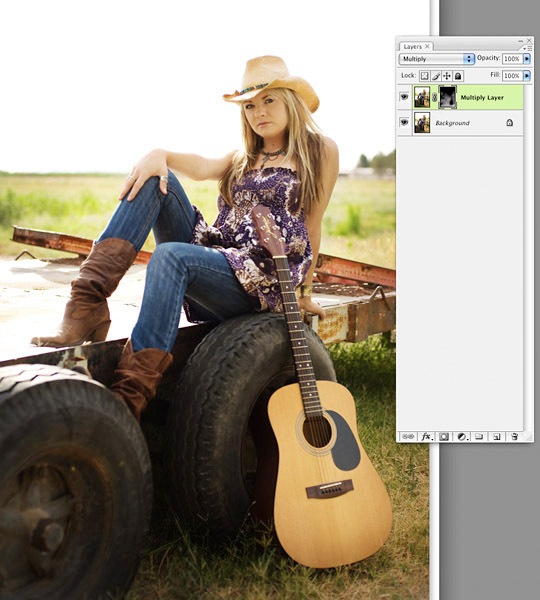
The duplicated layer is going to become my multiply blend mode layer by selecting multiply from the drop down menu in the layers palette. This will initially create a very dark image (try it). At that point I will create another layer mask and invert it so that my multiply layer is not showing at all. I want to selectively color in my multiply blend mode layer at 15-20% opacity and the layer mask will allow me to do that. Selectively adding in the multiply layer will give your image more depth and contrast, but in a controlled way…as shown above.
Flatten / Duplicate Background layer.
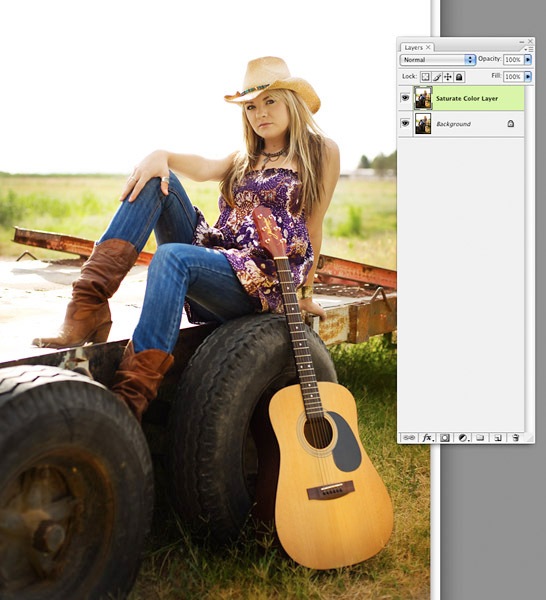
My next step is to add some color vibrancy on the top layer by selectively using the saturation brush at around 15-20% opacity. I’ve saturated her clothing, the grass a bit, and the edges of the wagon.
Flatten / Duplicate Background Layer.
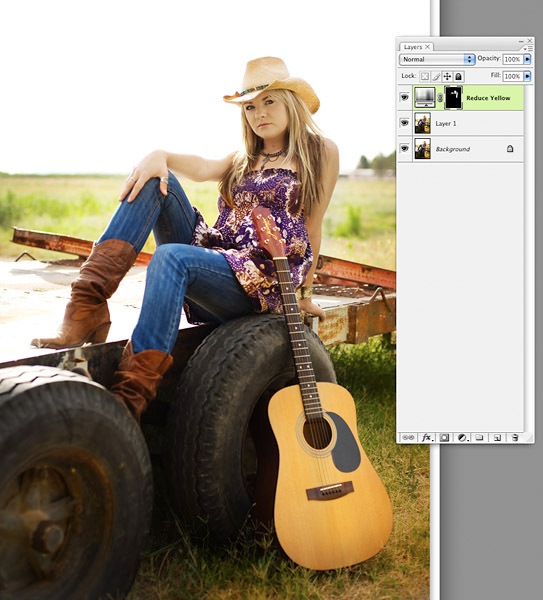
At this point I am going to reduce the yellows in her skin a bit more because I feel like there is still a stronger overtone of yellow in her skin than I like. Your image may not require additional skin work, but be mindful of the skin tones as you process your work…they can change and shift as you apply different techniques.
Flatten / Duplicate Background Layer.
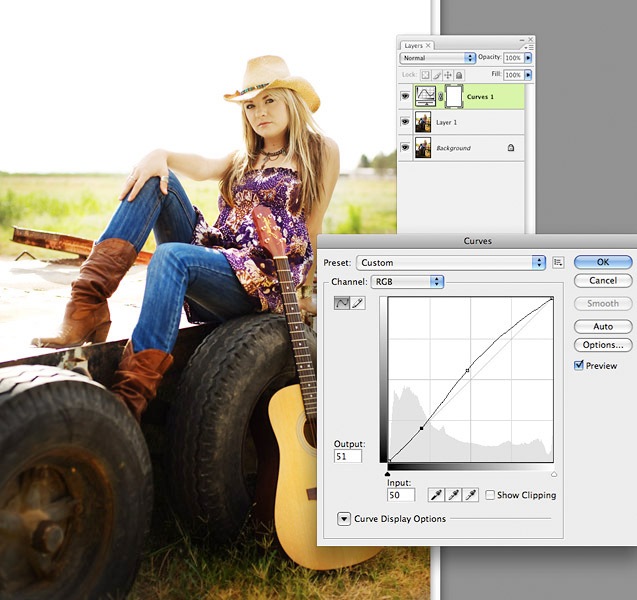
I’m not happy with the overall brightness of my image at this point…so I’m going to again bring up the midtone curves with a curves adjustment layer. This also helps to make the colors “pop” a bit more.
Flatten / Duplicate Background Layer.
Doing that last curves adjustment has created some unwanted reds in the shadows of my subject’s skin tones (a common problem), so I am going to use the desaturation brush set to around 10% opacity to brush the areas where the red is too strong. In this image I desaturated her neck, the tips of her fingers, and around her hairline.
Flatten / Duplicate Background Layer.
At this point it’s time to sharpen my image if needed. I run my sharpening method on my top layer.
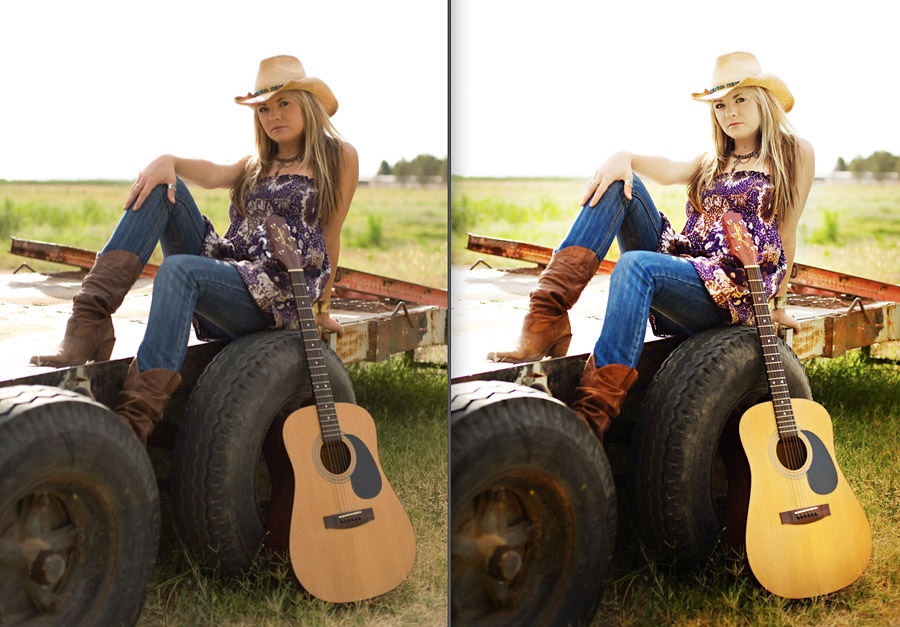
Here is a side-by-side comparison of the before and after.
Then…with a little more fine-tuning and your own creativity you can finish it up by adding your own unique style into the image!
I didn’t have time to go back and answer questions this time…but, if there are questions from this post then I will either answer a few in the next post on Viral Marketing or I will see about answering a few in a separate post.
I’ve also received several emails inquiring about future workshops in addition to the Phoenix FOCUS Photography Workshop August 14th & 15th (there is ONE spot remaining for the August workshop). And, although I had not planned to do any others before the end of the year…the plans have changed a bit!
Thanks again for having me Jodi!
No Comments
Leave a Comment
You must be logged in to post a comment.















hey thanks so much for the tutorial 😉
Well done. Good tutorial. Thanks.
Awesome Post Sandi! Thanks so much for sharing with us on MCP!
wow the image looks great! Thanks for taking the time to share this Sandi and many thanks to Jodi too. I’m really excited to hear about how to creat a nice blue sky when the sky is blown out. It’s been tearing up my head trying to figure this out!
She looks like a ghost!
Loved this one! It’s very similar to what i’m doing except i never quite understood that multipy layer mode til now 😉 Thanks Sandi!
Thanks for the tutorial! It looks great!
Wow thanks I never knew you could lasso and only change the curve of what you lasso’d awesome thanks!
This was very helpful. Thank you so much Sandi. The multiply layer method is a new one for me, I look forward to trying it!
Love it! Helpful info, as always. Thanks!
Love the processing. The girl will probably regret her choice of props in the future, though.
Great post Sandi! Love the image and your PP. 🙂 Thanks for the great info.
Thanks for the editing tips. Always love your stuff!!!I am hoping you come to SLO for a workshop
just curious on this one… i had a really tan senior and lightened her up in the same way and she was disappointed that she looked “so pale.” The images came out of the camera pretty close to the SOOC you show here… any thoughts on tans?
Wow, great tutorial!! A little advanced for me, but I’m attempting the techniques anyway! I’m trying to follow your steps on my own photo and I’m having trouble “inverting my layer mask” after adjusting my hue/saturation. I’m to this step:”Once I’ve clicked “OK”, I am going to invert my layer mask and then paint back in the areas of her skin where I want the adjustment layer to show through at 100% opacity as shown above.”Every time I invert my Hue/Saturation layer it looks like film negatives? Am I doing this correctly?BTW, I never knew you could lasso select your image to adjust curves accordingly either! I love this blog!
Thanks for the tutorial. Hope you can answer a question I have about sharpening. Do I sharpen the hi resolution file or do I only sharpen for web and print? And what is the best technique for sharpening?
Thank you for this good Tutorial. Great from germany
Thank you! Thank you! Thank you!
I enjoyed the tutorial Sandi. I was wondering if the white sky bothers you at all, and if anything could be done about it during capture as opposed to after in PS? Thanks.
You’re all very welcome for the tutorial. 🙂 Johanna – you asked if the white sky bothers me…and yes…in this particular image it does. (It doesn’t always…depends on the image), so my final version of this image was bit more processed…more to my style and taste than what I posted here…and it did include a sky. I’ll post my final version on my blog here in a bit. Jodi and I decided not to post my final version since it was considerably more processed than where I took it to in the tutorial. I hope that helps!
Sandi, wonderful tutorial. Loved the multiply/mask tip. Have already tried, and really love it. Thanks so much for sharing.
Thank you for this good Tutorial