Featured Products
-
Sale!
-
Sale!
-
Sale!

-
Sale!

-
Sale!


Photography is an art form, and when it comes to art one thing is sure: Art is subjective. And while there are some skills, like exposure and overall white balance that are more technical, many things come down to taste. For technical critique, definitely listen and learn. When it comes to more personal questions of style, listen, be open, and form you own ideas.
Whether you are asking if people prefer black and white or color images, muted and hazy or vibrant color, you will get varying opinions. Unless you have the “your way or the highway” mentality, you’ll soon see that you need a thick skin if you ask for opinions on your photographs. I personally enjoy asking what others think, but even more like to hear why they have the viewpoint. It helps me see in new ways, even if I disagree.
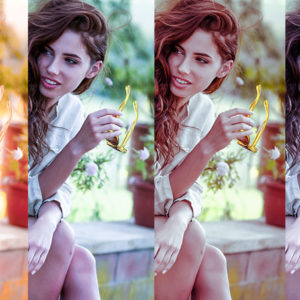
Here are three versions of a sunset silhouette taken in Queensland, Australia.
The first labeled “natural” was straight out of the camera. The third was a Lightroom edit. And the second image was a blend of the two in Photoshop.
Strong Edit: used the Lightroom Preset (from Quick Clicks Collection) called Sunset Silhouette Heavy Base. In addition I increased the saturation slider to +60.
Light Edit: exported the two images – SOOC and the Strong Edit into Photoshop. I stacked one on top of the other. And I adjusted the layer opacity to 50%. This is one way to control the opacity of a global Lightroom adjustment since there are no true opacity controls in LR4.
So now the tough question….
Which of the 3 versions do you prefer and why?
Leave us a comment to share your thoughts. I personally see merit in each of the three, but I love intense color, so when it came time to print, I went with the strongest edit.
Here’s what a few hundred other photographers said when surveyed on Facebook. As you can see, it was close to a three way tie, at least eye-balling the answers.

Want to learn more about photographing and editing silhouettes?
Here are a few helpful tutorials on photographing and editing silhouette images:
- Photographing Perfect Sunset Silhouette Portraits Every Time
- Controlling Light and Getting Interesting Silhouettes
- Sunset Silhouettes
- Photographing and Editing Silhouettes: Part 1
- Photographing and Editing Silhouettes: Part 2
- Using Silhouettes in Maternity Photography
- Editing Silhouettes in Lightroom
No Comments
Leave a Comment
You must be logged in to post a comment.


Recent Posts


I really like the strong edit the best, but I admit the light edit has a more realistic appearance. The natural shot seems a bit flat, tho maybe it’s because it’s right next to the other two.
I tend to like photos that don’t look over-edited. The strong edit looks photoshopped to me. I definitely prefer the light edit!
I’d probably go with the light edit. The strong edit is beautiful but a little too far from the original.
It’s nice to see you reaching through the screen to remind me that not everyone will like my photos. I’m very new at photography and it’s hard to see others with tons of feedback and my poor photo has nothing. But I am learning and I can see my pictures getting better each month. So I just have to remind myself what my purpose is and try not to wear my photos on my sleeve. Or compare myself to others.Thanks again
I really like the light edit. The strong edit is a little to much for me and no edit is a little flat. I think the light edit still gives it a natural look.
Light edit looks realistic when compared to other two versions. So i prefer light edit to be best.