Featured Products
-
Sale!
-
Sale!

-
Sale!

-
Sale!

-
Sale!


For the first time ever, MCP is making it easy for you to create storyboards and collages from inside of Lightroom. No more going to Photoshop to get things ready for print or the web.
Not many people use the print module in Lightroom, and no one that we know of has ever sold a product that makes image presentation so easy. Now, without leaving Lightroom, you can:
- Create storyboards in many popular prints sizes ready to upload to your print lab (Present It)
- Post a single image with a branding bar to the web (Display It)
- Show of your edits with a Before and After template (Display It)
- Create collages that will pop on Pinterest and other social media sites (Display It)
- Print 5×7 marketing cards (great for postcards, senior reps, etc) (Print It)
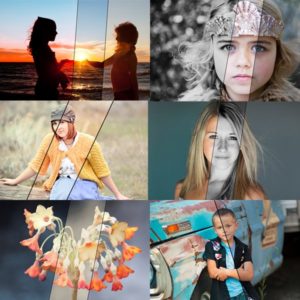
Have you tried out our new storyboard and collage templates for Lightroom yet?

MCP’s Present It for Print Collection builds collages custom sized for printing on many popular paper sizes.
And Display it for Web sizes and formats your photos perfectly for displaying on the internet. Whether you just want to show off one photo, create a Before and After, or build a collage full of images, these templates will do it for you – quickly and easily, without leaving Lightroom!
We’ve created lots of short videos for you to show you how to customize these templates to match your needs and branding.
The first video you should watch, if you haven’t purchased this product yet, is this 40 second demo that shows the creation of two collages with 9 photos total. Yes, you can use Lightroom to create two storyboards, one with 5 photos and one with 4, in less than 40 seconds.
[embedplusvideo height=”477″ width=”600″ standard=”http://www.youtube.com/v/TYzUDEXc1ag?fs=1″ vars=”ytid=TYzUDEXc1ag&width=600&height=477&start=&stop=&rs=w&hd=0&autoplay=0&react=1&chapters=¬es=” id=”ep4824″ /]
Preparing your images for the web has never been faster, since you don’t even need to leave Lightroom now.
And now that you know how easy it easy to collage your images, watch these video to learn about your customization options.
For instance, would you like to learn how to add your own digital papers to use as backgrounds or design elements? This video will show you how:
[embedplusvideo height=”365″ width=”600″ standard=”http://www.youtube.com/v/py1WAe0d9Cs?fs=1″ vars=”ytid=py1WAe0d9Cs&width=600&height=365&start=&stop=&rs=w&hd=0&autoplay=0&react=1&chapters=¬es=” id=”ep9908″ /]
Or, do you want to create a template that is custom sized for YOUR blog? Here you go:
[embedplusvideo height=”477″ width=”600″ standard=”http://www.youtube.com/v/l4NTTDJRDKA?fs=1″ vars=”ytid=l4NTTDJRDKA&width=600&height=477&start=&stop=&rs=w&hd=0&autoplay=0&react=1&chapters=¬es=” id=”ep2425″ /]What about rotating a template from horizontal to vertical orientation, or vice versa?
You can use Display It for Web to create Before and Afters to show off you editing:
[embedplusvideo height=”365″ width=”600″ standard=”http://www.youtube.com/v/igLKGuqcmVU?fs=1″ vars=”ytid=igLKGuqcmVU&width=600&height=365&start=&stop=&rs=w&hd=0&autoplay=0&react=1&chapters=¬es=” id=”ep9772″ /]
And you can create branding bars that show your identity to the world:
[embedplusvideo height=”365″ width=”600″ standard=”http://www.youtube.com/v/9HlIY8AAQ_k?fs=1″ vars=”ytid=9HlIY8AAQ_k&width=600&height=365&start=&stop=&rs=w&hd=0&autoplay=0&react=1&chapters=¬es=” id=”ep8620″ /]
No Comments
Leave a Comment
You must be logged in to post a comment.


Recent Posts


Thanks ScottThis is a great Tip – Nikon Capture NX2 has something quite similar, but now I love LRregards, Erik
Do you add any additional sharpening in Photoshop before printing? Thanks
You could if needed, but you should not need to if you get the sharpening correct in LR.
Couldn’t you do the same thing with a high pass layer set to overlay in PS? I mean, that’s neat, but if I’m already in PS doing things, I might as well do the finishing sharpen in there too.
But if you only use Lightroom, which more and more are going that way, this is a great solution. There are many ways to accomplish selective adjustments and masking in Photoshop and Elements of course.
This is a great tip! I don’t use Lightroom though. :-/ Do you know, is there a way to do something similar in CS5?
High-pass sharpening plus an added mask would give you full control in Photoshop. Many of our sharpening actions use high-pass, though we also like USM depending on the photo.
This is fantastic! I use Lightroom 4 exclusively and this will make my workflow so much quicker! Thank you.
Thank you!! I really needed this reminder. I learned it once and promptly forgot it. Lightbulb!
I have used this LR tool for a while know..learned it from Matt K. via his LR tips and tricks blog. It’s so fast & easy. If your a LR user you will love it.
Hate auto correct “now” not know.. 🙂
Just when I thought I knew so much about Lightroom, you come along and teach me something new and awesome. Thank you! This is extremely helpful 🙂
What a great tool. Thank you for sharing!!
Thanks for this tip; I need a hundred more like it. I’m trying to rely more on Lightroom and less on Photoshop to speed up my workflow, but its so hard to struggle in lightroom when I’m confident in photoshop. I end up doubling my work by editing the images in both.
Might be easier and faster to just mask the eye (or where you want the adjustments to be made)and use the adjustment brushes. You can go into the brushes, hit O to see where the mask is being applied, adjust brush size and mask the only areas you want to adjust, hit the O again, and use the sliders to make adjustments. That way it only adjusts exactly where you made the mask. Then you don’t have to rely on general masking results and levels. Just a thought!
Once again, Erin has made my life easy! Thank you for this tip!
I tried this on my LR 4 and the alt key locked up my masking and wouldn’t let me move it and didn’t change the picture at all. am I doing this wrong????
contact our help desk and reference this blog post.
I’m just wondering…sometimes the sharpening mask looks really cool. Is there any way to keep that effect or recreate it? (I’m talking about when you hold alt/option and slide mask)
I just stumbled across this through google tonight and this is fantastic!!! Thanks so much!!