Featured Products
How To Fix The Five Most Common Pet Photography Editing Mistakes
Whether your model is a human or animal, you always want them looking their best so that you look good as a professional and so that your clients buy the stuff you are selling! Don’t fall victim to the five most common pet photography editing mistakes.
In this post you will learn what the most common animal photography editing mistakes are, how they happen, how to avoid them, and how to fix them. These common mistakes can take a perfectly beautiful, reasonable and normal pet photo and make it crazy and out-of-line! In this post you can learn how to avoid offending your clients, fans and colleagues with your overly-wacky pet photography editing. Shown are some quick and easy steps in both Lightroom 4 and Photoshop CS5.
Mistake 1: BLUE FUR
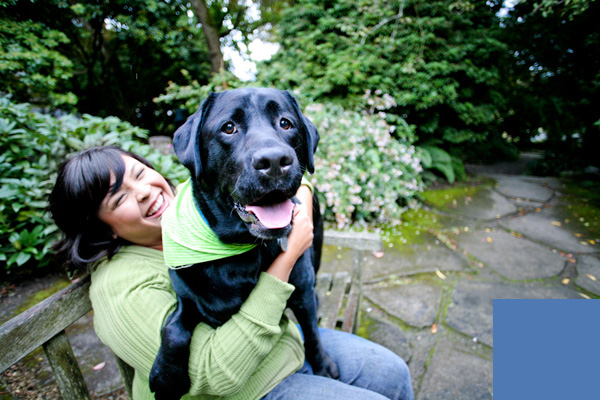
Sampson the black lab with his owner after touring the Smurf factory for 3 weeks. They invited him to be an honorary Smurf, but in his customary humble Sampson fashion he declined, saying “Thank you but, I’m just a dog”.
This is a very common pet photography editing error. Luckily, this problem is very easy to solve in both Lightroom and Photoshop.
In Lightroom:
Before you start sliding color and saturation sliders around, try warming up your overall White Balance a bit. Drag the Temp slider a bit to the right, and see if that doesn’t tone down the blue fur.
Then, you can fix blue fur using either the HSL sliders or the Adjustment Brush.
HSL sliders: if you have no other critical areas of blue in an image, this is the easiest fix. Simply navigate to the HSL panel, click on ‘Saturation’, then drag the blue slider over to the left until the fur looks natural. You may need to drag the cyan slider to the left as well. Sometimes you may even need to drag the purple slider a bit over as well. The goal here is to tone down the unnatural tone in the fur, without completely removing all color, as completely grey fur also looks unnatural.
Now if you are in the unenviable position of having a Smurfy-blue dog, and a blue sky (or other element) in the same photo, use the Adjustment Brush, and click on the Saturation slider and slide it over to the left to tone down the color, then just brush over the fur. You can also add a new mask and ‘paint on’ a warm yellow or orange color to warm the fur up. Just make sure the color you are painting on is very subtle.
In Photoshop:
The easy way to get rid of blue casts on black fur, try MCP’s Bleach Pen or Color Safe Bleach Photoshop actions (from Bag of Tricks).
The longer but not too hard route: Duplicate your background layer.
Go to Image –> Adjustments –> Replace Color
Click on the blue fur on the dog. You may need to click on the eyedropper with the plus symbol (‘add to sample’) to add more areas of the dog’s fur, as well as play around with the fuzziness slider to affect all of the areas in question. If there are other blue areas in the background don’t worry about it, we’ll fix that in a second.
Now, drag the saturation slider to the left until the fur looks natural. If you have other areas of blue in the image that are negatively affected, simply erase the image around the dog with a soft brush to reveal the original background layer below. Alternatively you can create a layer mask and only adjust the areas you have masked, but unless you have a very sharp line between the blue fur and the blue ‘other elements’, usually just erasing the image around the dog is the quickest and easiest way to do it. Also, doing this enables you to adjust the blue on the background layer (make more vibrant, darken midtones, use curves- whatever), without negatively affecting the dog’s fur again.
If you need a more complex fix, try this:
Go to Image –> Adjustments –> Selective Color
Select blue (or cyan), from the drop-down menu, and drag the yellow slider all the way to the right, and the blue slider all the way to the left (or whatever- just make it look natural).
How to avoid it: sometimes adding straight contrast, either in Photoshop or Lightroom, or too much black can make the fur go blue. Try backing off on all of your editing, give it some breathing room, don’t be so heavy-handed (be gentle people!), and the dog’s fur may reward you with fixing itself.
This is what a black dog should look like. He still has some blue highlights, which is normal, but it’s a very subtle grey-blue, not the shade of your next car. (Note- in the before photo above, the blue square is the color sampled directly from poor Sampson’s fur. If you are ever in doubt about the color in an animal’s fur, try using the eyedropper tool in Photoshop and dragging over the fur areas in question. If any profane statements of shock escape your lips while doing this, it’s time for a fix).
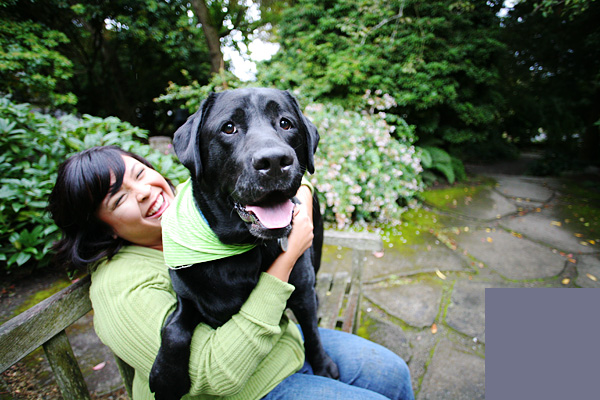
Sampson, pre-Smurf factory tour.
Mistake 2: NEON COLORS
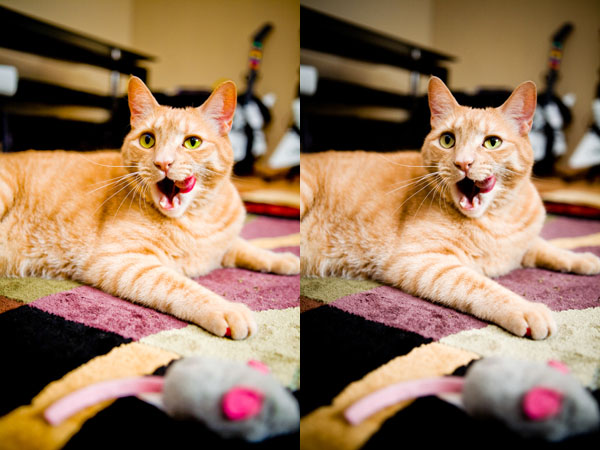
Rupert before and after attending the Circus School for wayward felines.
When processing pet photos, the goal should be to have the final image look ‘real only better’, not like it came out of a freak-show editing circus run by a band of neon Pantone fanatics. In other words, tone it down people, tone it down! I mean, shhhh, tone it down people, tone it down….
Here’s how you do this.
In Lightroom:
In the Develop panel, see where it says ‘Saturation’ at the bottom of ‘Presence’, right above ‘Tone Curve’? So now you are going to drag it to the left around -27 (or more, depending on how wacked-out your image is) and then, this is important- you are never going to touch it again. Cool? Cool.
The problem with the Saturation slider is it’s like your tacky aunt from Vegas who wears too much perfume, talks too loud, wears lots of jewelry, and drinks too much. At first you’re like “hey, fun!”, but after five minutes you’re like “eeesh…”.
Now, in contrast to your Auntie S., your beautiful Cousin V. walks in the room, with her flowy yet tailored silk pants, her long golden hair perfectly combed, her french manicure showing nary a nick, and her voice like velvet against your skin. She’s ‘Vibrance’ in Lightroom and Photoshop terms. Use her. She’s much more sophisticated and, well, beautiful. You can take her in large doses and she still won’t offend you.
If, instead of an overall color explosion you simply have areas in question, follow the steps in problem #1 above.
In Photoshop:
Same thing as Lightroom.
Go to Image –> Adjustments –> Vibrance
Drag the Saturation slider way over to the left, and then the Vibrance slider over to the right.
If that doesn’t quite do the job, you can try this:
Go to Image –> Adjustments –> Hue/Saturation
Select the wacky color in question from the drop-down menu, adjust the hue, and slide the saturation slider to the left.
Then selectively adjust the colors that are out of whack.
How to avoid it: remember Auntie S. from Vegas? Avoid her as much as possible.
Mistake 3. HEAVY VIGNETTES
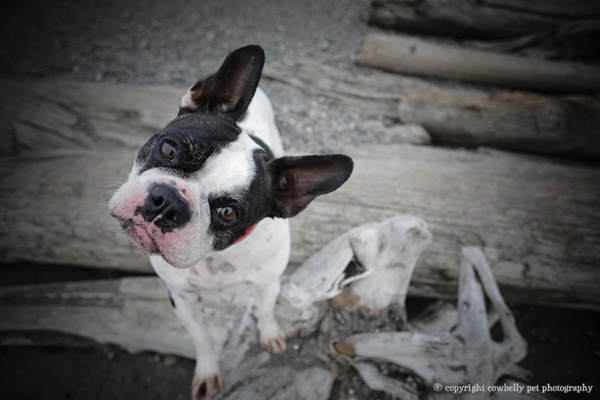
The thick black goo threatens to envelop Henrietta unless we come to her rescue in Lightroom or Photoshop.
On noes! Your photo got mysteriously enshrouded by a dark, black cloud. A thick, oppressive, depressing, dark cloud, that threatens to envelop the beauty of this magnificent animal and send them into photographic obscurity! Don’t let this happen to your photo! Poor animal. It’s ok, we can save them.
In Lightroom:
I personally LOVE Lightroom for fixing this issue, because it’s just so darn quick and easy.
Just do this:
In the Develop panel, scroll down to Lens Corrections. Click the little box to the left of ‘Enable Profile Corrections’. If your lens isn’t listed, add it (or something close to it). Voila! Vignetting fixes itself. This one-click fix is usually all it takes, and it’s just awesome. Like, red velvet cupcakes awesome. Like Starbucks Pumpkin Spice Lattes awesome. Like finding great jeans on sale awesome. I digress!
More likely though, this is something you have added. Whether you added it in Lightroom to a RAW file or later in Photoshop on a JPEG file, you can still remove it (or reduce it), in Lightroom by clicking Manual under Lens Corrections, and under Lens Vignetting, dragging both the Amount (controls how strong the vignette is), and the Midpoint (controls how far into the center the vignette goes), over to the left.
In Photoshop:
Filter –> Lens Correction
Click the Custom tab, then under Vignette, slide the Amount to the right, and the Midpoint to the left.
How to avoid it: Sometimes heavy vignettes are unavoidable, like from my beloved Canon 20mm lens used wide open at f/2.8 on the full frame sensor of my Canon 5D Mark III. Holy dark corners- vignetting up the wazoo there. But vignettes as heavy as the one above are added with software, so avoid going nuts with a vignette that heavy while processing.
There is nothing wrong with a vignette, but we still want to be able to see the beautiful photo underneath it.
Like this one! Henrietta is happy she can breathe again. It was getting suffocating under all that dark goo. (She still has a vignette, but it’s much more subtle now).
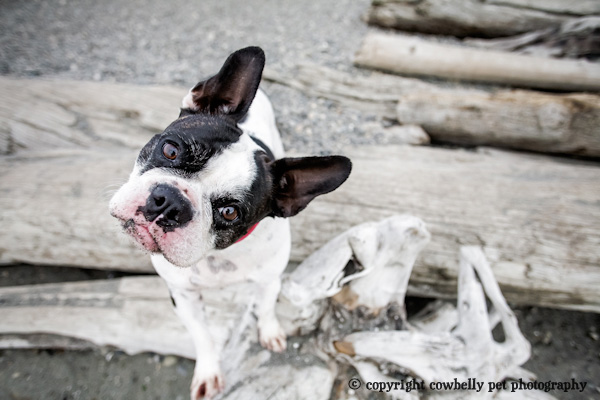
Henrietta, freed from the evil black goo, can now run and be free, with the wind in her fur.
Mistake 4. OVERLY-LIGHTENED SHADOWS AND BLOWN OUT HIGHLIGHTS
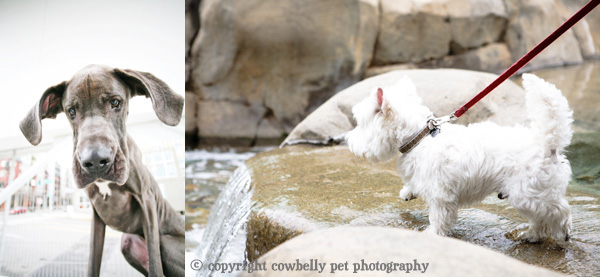
Astro and Rocco, looking a little worse for the wear after a late night post-processing session.
Whoa, why does this photo look, so…… weird? Because you blew out the shadows, silly! (left). AND……… you blew out the highlights! (right). Noooooo…….
Now don’t get me wrong, I have a very solid love affair going on with Fill Light/Shadows in Lightroom. If I could marry the Shadows tool in Photoshop Image Adjustments I would. BUT, I know when to draw the line with these lovers and set firm and clear boundaries. You should too. Just say “NO” to too much fill light.
Just like overly-lightened shadows can make an image look weird, so too can blown out highlights, when the light or bright areas have gone white. White parts of an image are simply lacking data. Imagine the whole world like this- lacking data. We wouldn’t be able to talk, to drive, to use a computer, to communicate, or even think! Oh the horror! You don’t want your photos contributing to this ‘lack o’ data’ crisis, so let’s try and retain the data, shall we?
In Lightroom:
For overly-lightened shadows: Add some blacks and midtones back in using the Black slider under Basic (Develop panel), and Darks slider under Tone Curve.
For blown highlights: drag the Highlights slider (under Basic), far over to the left. You can get really aggressive here, because Lightroom 4’s highlight recovery is very sophisticated. Even more sophisticated than Cousin V. if you can believe it.
In Photoshop:
For overly-lightened shadows: just add darks and midtones using either levels or curves.
For blown highlights: make things easy on yourself and use MCP’s Photoshop Action Ooops I Blew It. One-click and you’re done.
How to avoid: If you are ending up with washed out looking images from overly- lightened shadows, ease off on the Shadow slider in Lightroom, or the Shadows tool in Photoshop. You can always selectively lighten areas (like eyes or under ears) that are lacking catchlights or detail without lightening the shadows on the entire shot.
For blown highlights, this is often (although not always) an issue with exposure in camera. Make sure you are using the proper metering mode for the scene, and avoid high-contrast situations with white dogs, like bright midday sunshine, or a dog laying in part shade, part sun for example. Also, adding straight Contrast in Lighroom or Photoshop can sometimes make your darks too dark and your brights too white if you use too heavy of a hand. Ease up on the Contrast sliders if you find your images look fine SOOC but the highlights get blown while processing.
There, now don’t Astro and Rocco look better? (below)
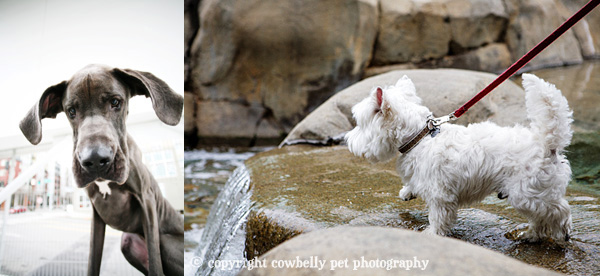
Astro & Rocco looking much more presentable after a light-of-day processing session. No missing teeth, tigers in bathrooms or random babies here.
MISTAKE 5: CRISPY SHARP
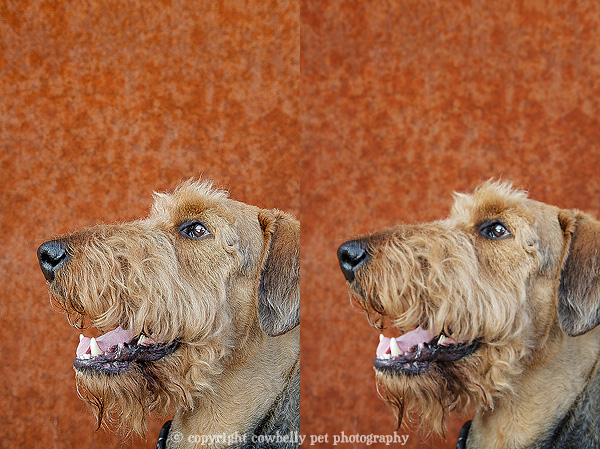
Henri is so crispy on the left we could eat him like our favorite chip. He’d probably come with a french onion flavor. On the right he looks sharp but soft and still approachable, and instead of eating him, we just want to pet him.
Ok, let’s be real here, how many people want their eyes poked out by a photograph? I can tell you- not many!
Please don’t be cruel to the viewers of your photographic art who wish for a, well, –softer– experience. You want to soothe and please their eyes, not assault them with the ocular equivalent of a porcupine quill Brillo pad. No porcupine photos here!
In Lightroom:
Lightroom’s sharpening is a little, well, tricky. Try this: Amount: between 35 and 75 (use a lower amount for web), Radius: 0.4 to 1.6 (use a lower radius for web), adjust Details if you have a lot of fine detail you want sharpened, and adjust Masking if you have a lot of negative space you don’t want sharpened, like the background in the image of Henri above for example. If you hold down the Option key (Mac) or Alt key (Windows), while you slide each slider, you can see a masked preview of the areas being affected. (Cool, yeah?!)
In Photoshop:
Make things easy on yourself and just use the MCP High Definition Sharpening. This will leave your images beautifully sharp, not like they just got ran into by a truck filled with thumbtacks.
How to avoid: Avoid using the basic sharpening tools in Photoshop, like the straight Sharpen or Sharpen More (under Filter –> Sharpen). These are a crude way of performing overall sharpening, and the more times you run each on one image, the worse it looks. If you don’t have MCP’s High Def Sharpening action, try duplicating your background layer, going to Filter –> Other –> High Pass, and selecting an appropriate radius (0.4-0.8 for web; 1.2-3.8 for high-res/print), then, in the Layers window, select Overlay from the layer style drop-down menu. Lower the opacity to taste. This is called ‘High Pass sharpening’. It’s fancy stuff. (But don’t worry- it’s super easy).
To sum:
- Don’t let the dogs in your images look like they’ve been moonlighting in a Smurf factory.
- Don’t let your images join the Neon Freak-Show Editing Circus.
- Don’t envelop your poor animals with thick black goo. (Let em breathe people!)
- Don’t take ‘white’ literally in the highlights of your images, and don’t try to eradicate all shadows from your shots. (A little bit of darkness never hurt anyone, mwah ha ha ha ha).
- Don’t turn your favorite dog image into an advertisement for French Onion Crisps.
Now, I double, triple, quadruple dog dare you to go look at your pet photos and see if you can spot any of these processing plunders! It’s ok if you do, because now you know how to fix them!
===============================================================================================
Jamie Pflughoeft is a full time professional pet photographer, owner of Seattle-based, internationally-recognized Cowbelly Pet Photography, established in 2003. For more editing tips from Jamie, check out Jamie’s new book on Amazon.com: Beautiful Beasties: A Creative Guide to Modern Pet Photography, by Wiley Publishing. For even more (and free!) pet photography information, visit , an educational website for pet photographers filled with pet photography tips & techniques, workshops, classes, PDF guides, and information on how to join the Beautiful Beasties Network, a forum of professional pet photographers worldwide.
No Comments
Leave a Comment
You must be logged in to post a comment.






















Jamie…I LOVE the way you write!! Best advice ever with so much humor..I love it!!!! Thank you…Thank you!!!! :DKim
Such great tips! My pet peeve with beginner editors (everyone has to start somewhere) is that “turquoise” wedding dress when the white balance is out of whack!
I don’t shoot pets that often, but these tips are fantastic! What a great post–such detailed instructions. A keeper for sure. Thank you for sharing your knowledge and ideas!
Hmm…Have you been looking at my photos? 🙂 Great article and much needed! Thank you.
Jamie, you are awesome! And you totally pin pointed the problem areas and gave the “photo correcting for dummies” layman’s version, which is so helpful! ;)I have experienced these problems myself and have learned to correct a few, but definitely learned alot from this posting! Will be keeping this page on the ol’ favorites bar for future reference. Thanks, MCP, for having such a talented photog give advice on your site.
Hi Jody, I have LR 3. Please tell me the changes and similarities in the BASIC Panel of LR 3 and LR 4. Such as the exposure vs highlights and so on. I get confused. Thank you
Thank you so much for these tips! I volunteer at my local animal shelter and photograph animals for their adoption profiles, often working with less than ideal conditions in terms of lighting, set up, etc – so every little trick I can use to make a photo pop (and make a potential adopter fall in love!) is much appreciated. 🙂
These aren’t “editing mistakes,” these are judgment calls on the aesthetics of the image that THIS particular photographer doesn’t like.