Featured Products
You might remember the controversy surrounding this photo. Its beauty and editing potential are so great that we are using it again as an example to illustrate how to use the Lightroom 5 Radial Filter. Thanks again to Dayna Moore for sharing this fabulous image with us!

The Radial Filter is a tool that was introduced with Lightroom 5. This filter allows you to apply local adjustments to your image with an elliptical, or oval, shaped mask.
Since we designed the local adjustments included in our Illuminate Lightroom preset collection with this tool in mind, I’ll use them to add lighting effects to this image. (Of course, you can definitely use the local Illuminate presets with either the Graduated Filter or the Adjustment Brush tools too.)
Taking You Step-by-Step Through In Using the New Radial Filter Tool
Step 1:
To begin, activate the Radial Filter by clicking on it. It’s circled in the image below, just under the histogram.
Next, you can choose a preset from the Effect drop down menu (under the arrow in the screen shot above). Or, you can adjust the sliders (to expand, click on the triangle above the number 76 above) to create the effect you’d like.
Once you’ve dialed in the settings, adjust the Feather slider near the bottom of the Radial Filter panel. A lower Feather will make the edges of your effect harder and crisper. A larger Feather will make for soft and natural transitions between the effect and its surroundings.
To apply the effect, click and drag with your mouse over the part of the image that you don’t want to change. For instance, in this image, I’ve chosen the Deep Blue Blur from the MCP Light local presets because I want to create a vignette effect around the kids, leaving them as is, but deepening and darkening the sky around them.
You can see the circular shape I drew in the image above.The sky within the circle still has it’s natural orange tone, but the sky around the outside of the image is a deeper and darker blue.
Step 2
My next step will be to emphasize the orange tones around the kids. I click the New button at the top of the Radial Filter panel, and then select the Orange effect from the MCP Illuminate presets. Before drawing I click on the Invert Mask box at the bottom of the panel – an inverted mask has the effect inside it rather than outside.
And now I draw a second oval, similar to the first.
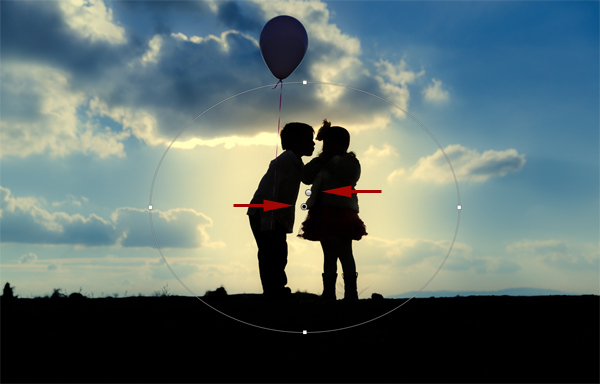
You can see in the screenshot above that I have two pins. Each controls one of the edits I’ve just made. The one with the black dot in the center governs the orange light. The black dot indicates that it’s active for editing.
When a pin is active for editing, I can make the following changes to the effect:
- Change any of the effect sliders or select a new preset to fine tune the look
- Change the size or shape of the oval by clicking and dragging on any of the 4 white boxes on its edge
- Move the oval by clicking and dragging inside it, but not on the pin itself
And to change the pin that is active for editing, simply click on the one that controls the area you’d like to change.
The Results?
With those two quick edits, I’ve created this edit:
Keep in mind that you can use this tool with any of the local presets included with our preset collections. For instance, InFusion’s Shade makes a great vignette that is more adjustable than Lightroom’s built in vignette feature.
So give Lightroom’s Radial Filter a try, if you haven’t already!


