Featured Products
MCP Actions Website | MCP Flickr Group | MCP Reviews
Quick Tip: I had a photographer write me today and ask how to change a mottled backdrop. She shot some senior pictures and the schools are requiring a brown backdrop. She only has blue.
Short of buying a brown one, here is a super easy way to fix this problem. I typed directions on the screenshots, but since the text looks small – I typed them out here too.
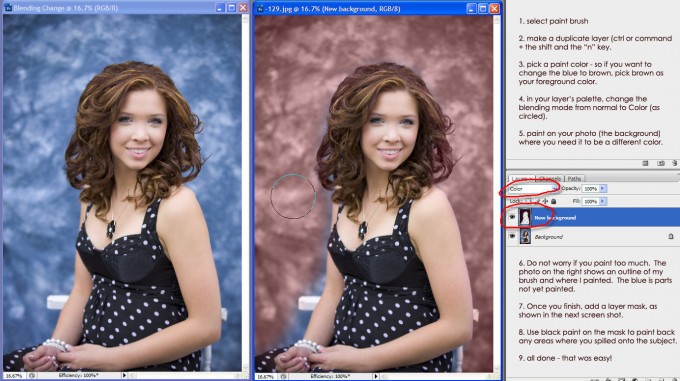
1. select paint brush
2. make a duplicate layer (ctrl or command) + the shift and the “n” key.
3. pick a paint color – so if you want to change the blue to brown, pick brown as your foreground color.
4. in your layer’s palette, change the blending mode from normal to Color (as circled).
5. paint on your photo (the background) where you need it to be a different color.
6. Do not worry if you paint too much. The photo on the right shows an outline of my brush and where I painted. The blue is parts not yet painted.
7. Once you finish, add a layer mask, as shown in the next screen shot.
8. Use black paint on the mask to paint back any areas where you spilled onto the subject.
9. all done – that was easy!
No Comments
Leave a Comment
You must be logged in to post a comment.


























Thanks Jodi for sharing this! I tried to do this using a high key photo, changing the white background to a colored one, but it didn’t work. Hmmm…wonder why it won’t work on a white background?
Another way I have seen to do this, is to open the file in Camera RAW, then open as an Smart Object, then while in PS, right click in layers panel and do new Smart Object via Copy, double-click the new layer’s icon, which will re-open Camera Raw, then mess around with the White Balance (Temperature) & Exposure to get the backdrop to look the way you want (don’t worry about how the person looks at this point). Click ok to accept those changes. Once you’re back in PS, add a mask layer to hide the top layer, then brush with white to paint & reveal the the parts of the top layer that you want to see.
okay. you are my new best friend. thank you for problem solving for me when I inadvertently used the wrong school requirements (not WHITE — so of COURSE all my seniors are using white. derr.)xoxoxo Tam
LOVE (in a sing-song voice) this! Thank you 🙂