Featured Products
-
Sale!
-
Sale!

-
Sale!

-
Sale!

-
Sale!

Our Lightroom Adjustment Brush tutorial series started with an overview of the basics of using the adjustment brush in Lightroom. Today, we’re going to wrap up the series and show you advanced features and tricks of using brushes.
Adjustment Brush Pins
The most important thing you can know about using this local adjustment tool is that Lightroom creates a separate pin for each individual edit you create on a photo. If you’re softening skin in one place and sharpening eyes in another, each edit will be controlled by the pin Lightroom creates for it. When you’ve completed one edit and are ready to move on to the next area, it’s very important to hit the New button at the top right of the Local Adjustment Panel in order to tell Lightroom to create a new pin.

If you forget, you might end up applying skin softening to eyes, or changing the softening you applied to sharpening instead. Neither is good, right?
The photo above shows the 3 pins I used to create spot edits. The one with the black dot in the center is active for editing. I can change the settings or strength of any pin that is active for editing, I can add or remove painted areas, and I can delete the entire edit by hitting the delete or backspace button on my keyboard.

I’m going to say this again, because I forget all the time. Each time you’ve completed editing one area and are ready to move on to the next, click the New button. Change the sliders to suit the new location, and begin painting following the steps for the first tutorial in this series.
You can have many pins on any one image. Are they getting in your way so that you can’t see to paint? Type the letter H to hide the pins. Type H again to turn them back on.
Toggle Adjustment Brush Edits Off and On
Want to see what your photo would look like without adjustment brushes? Click on the “lightswitch” at the bottom of this panel to toggle all adjustment brush strokes off or on. It’s not so easy to turn off one of many brushes, unfortunately – you’d have to delete it, then use the Undo History Panel to undelete it.
Change Multiple Sliders at One Time
If you changed several sliders with one adjustment pin, you can tweak them individually using the sliders, or you can reduce or increase their total strength with one slider. To use this handy shortcut, collapse the arrow at the top right corner of the local adjustment panel. You will now see one slider than controls everything you’ve already dialed in. Click on that arrow again to expand all the sliders. For example, rather than adjusting each of the 4 sliders that goes into this MCP Soften Skin preset from Enlighten for Lightroom 4, I can used this collapsed slider to adjust all for at the same time.

Memorize Brush Options
If you find that you use the same brush options over and over, you can memorize your favorite two sets. For instance, do you like a brush with feathering of 63 and Flow of 72? Click the A button and choose those settings. Now click the B button to dial in the settings of your other favorite brush. Click on A to revert to 63/72. Click on B to go back to your other brush. Those settings will remain until you change them.
Saving Presets
What about memorizing groups of sliders? Your favorite edits for eyes, for example. Dial in the settings you like. For eyes, you might increase exposure a little, and increase contrast, clarity and sharpening. Now, click on the drop down menu next to the word Effect. Click on Save Current Settings as a New Preset, and name it. Next time you want to edit eyes, click on this drop down menu and select your newly-saved preset.

Using Presets
What’s even better than saving your own presets? Use MCP’s specialty adjustment brush presets that come with Enlighten for Lightroom 4. We’ve programed them with our own secret forumlas to give you 30 photo perfecting effects, from skin softening to detail finding and color burning. Using them is as simple as selecting one from the Effect menu and painting the edit where you need it.
Stack Brush Strokes
In this edit, I used the skin softening brush at full Flow, hit the new button, and painted over parts of the same area with the skin softening brush at 50% flow. This gives me more than 100% skin softening in key areas. It also creates a 4th pin, and beautifully soft skin. No need to go into Photoshop at all!
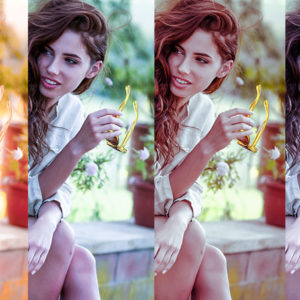
Before & After Workflow
Let’s put this all together with the steps that I used to edit the Before and After image above. Most of the edit was completed with just a few clicks of the Enlighten for Lightroom 4 presets.
- lighten 2/3 stop (Enlighten)
- soft & bright (Enlighten)
- blue: pop (Enlighten)
- blue: deepen (Enlighten)
- sharpen: slight (Enlighten)
- white balance tweak (my own)
- soften skin (Enlighten) – painted once at 100% flow and again at 50% flow over key areas
- crisp (Enlighten) – to bring out details of hair
- opened shadows in hair – my own settings. See part 1 of this series for details.
- detail finder (Enlighten) – to sharpen and brighten eyes
What’s the last step in this process? You need to put away your tool, of course. Either click on the close button or click on the brush icon to turn it off and return to global editing.
No Comments
Leave a Comment
You must be logged in to post a comment.


Recent Posts


ok, so, after reading your list of images you need to fix certain things…i am FREAKING excited for your actions to come out! you are so talented…
I just sent out 2 shots…I could probably find something to fit EVERY ONE of these categories…