Featured Products
-
Sale!
-
Sale!
-
Sale!
-
Sale!
-
Sale!

 Over the last year, I’ve transitioned to using Lightroom more and more. Although I don’t have as much control over editing as I would in Photoshop, I am finding that it saves me time. With practice, I am able to get edits that are virtually indistinguishable from similar edits in Photoshop. With MCP’s newest set, Baby Steps Lightroom presets, I finally have a set of brushes that can stand up to the difficulty of editing newborn skin! Here is an example of how you can use Baby Steps in your workflow, with step by step images.
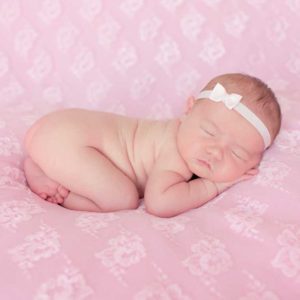
Starting image:

First Step crop and clone:
In this image taken at a client’s home, I used a blanket from Target, a few bed pillows, and a pack and play to set it up. The window was facing the baby directly and about 3-4 feet away. The first step was to crop and clone the draped blanket. I used the spot removal brush and it did a pretty decent job, but not perfect. (The remaining lines could be cleaned up in Photoshop easily.)

Next – Baby Steps Lightroom Presets:
To create the initial look, I used the Auto White Balance, Fix Underexposure 1, and Pick Me Up (Crisp Color). These three edits, though minor make a huge difference in the the overall look and feel of the image. At the very least, the baby looks more like she did in real life and the green cast was eliminated. However, the “purple feet” were bothering me so I addressed those next.

Fix purple feet using the local adjustments in Baby Steps:
Using the Red Baby Fix Adjustment Brush, I painted onto the baby’s feet to eliminate the redness. I made sure not to overdo it because I still wanted the natural pinkness to come through. In order to reduce the redness all over, I used the Hush the Reds with Baby Powder Light preset to correct her skin tone. It also smoothed her skin slightly and gave the image a little glow.

Last Step – finishing the image with a few more presets:
Finally, I decided the image needed a bit more contrast so I tried the different contrast adjustment presets and settled on Crying for Contrast Light. I also applied a “Blanket of Haze” called Baby Bottle Strong to add even more softness and airiness to the image. There were areas of her skin that seemed a bit off so the Gray Skin Fix Brush allowed me to warm them up a bit. I also used the Baby Lotion brush in a few areas as a finishing touch.

Here is the official before and after. Check out other Baby Steps edits here or jump right in and purchase the set. You’ll be happy you did!
Jessica Rotenberg is a family and child photographer in Raleigh, NC who specializes in modern portraiture and creating beautiful wall galleries for clients. She enjoys mentoring other photographers and participating on the MCP Actions Facebook group page. You can also follow her on Facebook. (photo credit: Rebecca Ames)


Recent Posts


