Featured Products
-
Sale!

-
Sale!

-
Sale!

-
Sale!

-
Sale!

-
Sale!

-
Sale!

-
Sale!


Due to many requests for this feature, Adobe added Soft Proofing to Lightroom way back in LR 4. Professional photographers love it because it gives lets them customize their photos for each type of output it might be used for – web, matte paper and glossy paper, for example.
To enable soft proofing, go to the Develop Module and put a check in the Soft Proofing box on the Tool Bar under your photo. Or type S, the shortcut. Don’t see the Tool Bar? Type the letter T to turn it on.

Now that Soft Proofing is enabled, you’ll notice a couple of differences in your workspace. First, you’ll notice that your workspace says “Proof Preview” at the top right corner and that the background will have changed to white to simulate real paper. Right click on the white background to choose a different tone of white.

Also, you’ll see a new Soft Proofing panel at the top right corner of the Develop module. It displays the histogram for your photo as it would be in the chosen profile, or output mode. Using the example below, we’re looking at a histogram for the sRGB color space, as you’d use for posting to the internet (Facebook, websites, blog, etc.).
The main benefit of soft proofing is that it can show you any major color shifts that will occur in printing, and it will point out any out-of-gamut colors. An out-of-gamut color is one that the destination profile (whether a printer or the sRGB mode) can’t reproduce well, usually because the color space is smaller than your editing color space. The Lightroom editing space, by the way, is huge – it’s called ProPhoto RGB. Printers and monitors generally can’t replicate all colors in this color space.
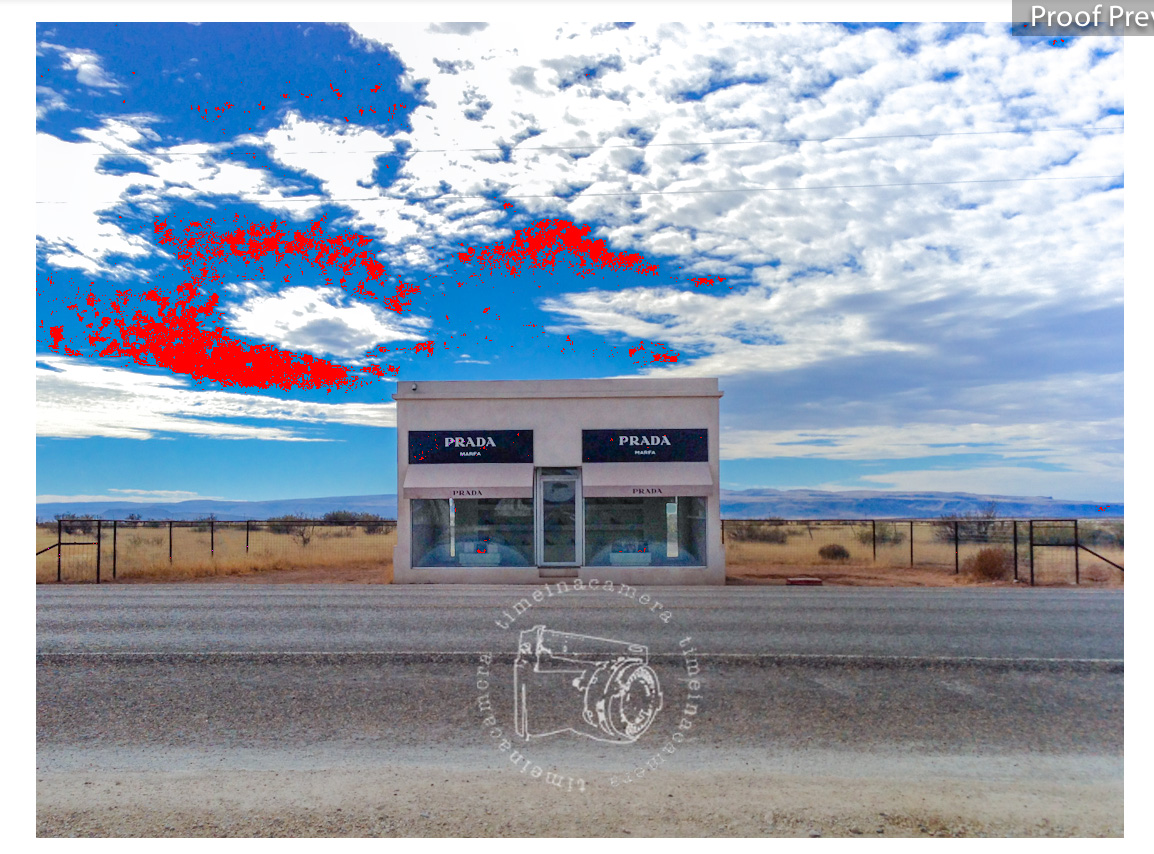
To display the out-of-gamut areas, click on the destination gamut warning at the top right corner of the Soft Proofing panel. Once toggled on, a red overlay will appear over any out-of-gamut areas for the profile you’ve chosen.
Once you’ve identified the areas that are out-of-gamut, you have several options for bringing them back to gamut. Often, changing Hue, Saturation or Luminance for the given color range will help. Use the target tool on the HSL panel for that. Or, use the local adjustment brush with a saturation reduction – this is especially beneficial if you only want to change one area, rather than all the colors of the color range throughout your image.
Let’s look at how soft proofing works for an image. When I take the following edit into Soft Proofing mode for the sRGB profile, you can see that part of the sky is out-of-gamut. My own eyes tell me that the sky is pretty saturated, and this is a good clue that it’s too saturated. So, I go down to the HSL panel and grab the targeted adjustment tool on the Saturation panel. I drag down on the oversaturated area of the sky until the red overlay disappears. 
As soon as I begin to make that adjustment, Lightroom asks me whether I’d like to Create a Proof Copy or make the edits on the current version of the photo. I want to create a proof copy so that I can have multiple proofs set up for each output device I might use.
After creating the proof copy, you can look in the Library module, to see now that there is a newvirtual copy (indicated by the turned up corner in the lower left corner). Additionally, Lightroom has given a Copy Name to the file indicating the Profile that it displays.

Now that I’ve corrected this file for the sRGB color space, this would be the version of the file that I would want to export to Facebook or post on my website. sRGB is usually the color space that professional print labs request as well.
Soft Proofing for Printed Images
You can change the Profile drop down menu in the Soft Proofing panel to show you a proof for a local printer that you’d like to use. When you install the printer drivers, these profiles will automatically appear in Lightroom. They are usually customized to the type of paper as well as the specific printer. This screen shot shows the print profiles that I use the most frequently.
Some print labs make their ICC profiles available. If you’re not happy with the colors in your prints, check the website of your favorite print lab to see whether these profiles are available.
When your output destination is paper, it’s best to turn on the Simulate Paper & Ink option.

The following before and after shows you the difference from my original edit to my soft proof edit. You can see that Soft Proofing can provide a good answer to the question of whether you took your edit too far!


Recent Posts


