
Sky Background Overlays for Photoshop and Elements
$58.00
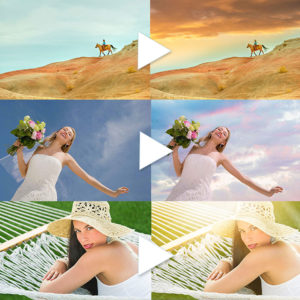
MCP™ Sky Background Overlays consists of 85 hi-resolution images. Of these, 6 are bonus images of frames, and 79 images in the actual Background Skies package.
“These are not just simple skies. They have been altered and created to work in Photoshop to accomplish some interesting effects that are easy to do.” – Tom Grill
Description
Using Sky Background Overlays in Photoshop:
The images in this collection have been created to make combining them as backgrounds with other images an easy process. Many of them have a neutral bottom area to ease the placement of the skies into the photograph by making the overlap area more neutral. Others, especially sunsets, have a neutral toned bottom area that allows the tone to carry through to the layer in your scene.
Some of the images have a second version labeled as “fade”. This means that the bottom part of the image transitions softly into a blank, see-through area making it easy to place these skies over your original photograph and work the two together by painting out some of the sky with a layer mask.
Watch Tom Grill show just how easy it is to use the Sky Background Overlays:
What’s Inside?
This set of overlays consists of 85 images. Of these, 6 are bonus images of frames, and 79 images in the actual Background Skies package. This set of skies has been specially prepared to make them easier to use when adding them to another image in Photoshop. In some cases the bottom of the image has been extended with a harmonizing tone that makes it easier to integrate the sky and/or the color into the scene. In eleven instances the skies have been duplicated and a faded bottom has been added to make it easier to place them over another image and gradually transition into the sky. These fade images have the end of their filename changed to include the word, “fade”. The instruction sheet shows how to use these varying techniques. The overlay files are high res and all have approximately a 6000 x 4000 pixel dimension to make them integrate better with images from modern digital sensors.
Layering Behind and Image:
The most common use of a background sky is adding it as a background layer to replace the original sky in a photograph. This is often done by masking out the original sky and allowing the replacement sky to show through from the layer below.

The Photoshop selection wand easily selected out the sky in the cityscape at left. Inverting the selection and using it to create a layer mask eliminated the sky from the middle sample. Placing the sky at left as a layer beneath the city scene resulted in the photo below. Adding a slight touch from a magenta photo filter adjustment helped harmonize the colors between the two images.

Layering on top of an image using a sky having a neutral bottom:
The landscape on the left was taken at actual sunset, but there was no detail and very little color in the scene. Placing Sky044 on top of the landscape and changing the sky layer rendering mode to “Multiply” merged the two images. Because Sky044 has a large neutral toned area on the bottom it carried the tone into the water areas on the bottom of the landscape photograph. All that needed to be done to complete the final image was to use a layer mask and paint out some of the sky that fell over the trees and vegetation. Adding a curves layer to lighten to whole scene took away the darkness that usually accompanies the “Multiply” mode.

Placing an overlay on top of a photograph with a white background:
Placing one of the sky backgrounds into an image with a white background is usually a simple process. Drop the sky image on top of the other photograph. Next change the rendering mode of the sky image from “Normal” to “Multiply”. This will usually darken the overall combination making it necessary to add a curves or levels adjustment layer on top to lighten everything. Next add a layer mask to the sky layer and, with a very soft brush and black selected, paint out those areas where you do not want the background image to interfere with the subject in the photograph. It is usually best to paint with a low (about 25%) opacity brush to allow some of the overlay coloring to bleed through and harmonize with the second photograph. In this case, the ‘1ree blur sunset” overlay was placed on top of a photo of a bride against a white background. It was very easy to paint out the background from the bride and flowers.

Creating a snow effect:
These images of snow were not artificially created in Photoshop. They are photos taken at night of actual falling snow against a night sky. They look real because they are real. There are several snow images, each with a different size or density of snow flakes. This sample uses Snow03. The image is placed over the photo layer of the woman and snowman and the layer rendering mode of the snow is changed to “Screen”. That is it except for a final use of the Spot Healing Brush to remove some of the flakes from over the model’s face.

Using an overlay with a “fade” bottom:
Fade bottom overlays are usually the easiest to apply. In the sample below the water front landscape was first moved lower in its frame to diminish the boring black shore area and achieve more of a rule-of-thirds composition. Next the Rainbow 2-fade overlay image was placed in a layer on top of the shore scene. The mode for this layer did not have to be changed as we wanted the rainbow to hide the sky in the water landscape image. The fade area automatically allowed the water scene to bleed through and all it took was the addition of a layer mask to it so we could paint out a bit more of the rainbow sky the merge the two images even better.

Combining images for creative effect:
This technique of allowing the background to show through the subject and not the background has become quite popular. It is best to begin with an image with a dark subject and very light background, as the one on the left below. You can even increase the contrast by adding a curves adjustment layer to it. Additionally, it often looks best when the color of that layer has been muted down to a monochrome look by using a Vibrance adjustment layer to lower the vibrance and color saturation. The clouds layer is placed below the that of the man. The layer rendering mode of the man is changed from Normal to Lighten, but that of the clouds remains set to Normal. That is pretty much it except t for brightening the clouds and sky some to make the overall image more etherial.
Additional information
| What Interests You? | Best Sellers, Templates & Finishes, Newest Sets, Textures & Overlays |
|---|---|
| Your Software Version | Photoshop Creative Cloud (CC), Photoshop CS2-CS6, Photoshop Elements 6-15, 2018 |
| Subject |
You must be logged in to post a review.
Related Products
-
Sale!

-
Sale!
-
Sale!
-
Sale!

-
Sale!
-
Sale!

Reviews
There are no reviews yet.