特色商品

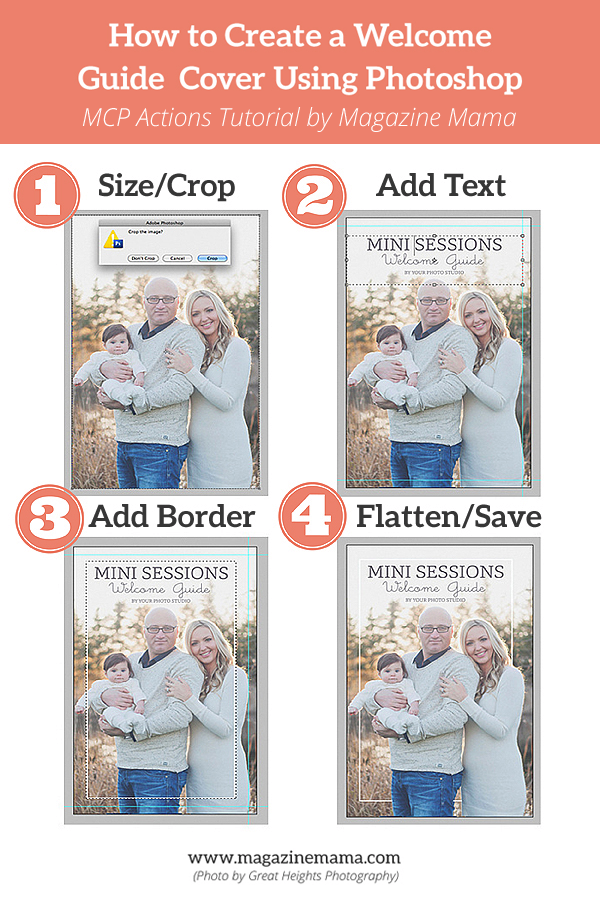
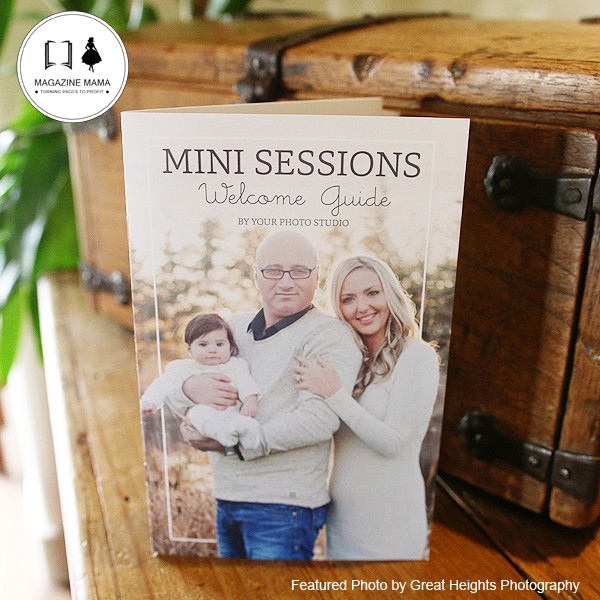
一些摄影师喜欢从以下公司购买预制的欢迎指南模板: 杂志妈妈,但如果您是DIYer,则可以使用Photoshop创建自己的照片。 In this example I will show you how to create your own welcome guide cover using Photoshop in just four easy steps.在此示例中,我将向您展示如何通过四个简单的步骤使用Photoshop创建自己的欢迎指南封面。
Before you get started you'll need to select the cover image.在开始之前,您需要选择封面图像。 The cover image is important because it sets the mood for the entire welcome guide brochure.封面图像很重要,因为它可以设置整个欢迎指南手册的气氛。 Make sure you use an image that will appeal to your target audience.确保您使用的图像会吸引目标受众。 I like to use an image that is cropped in close on the subjects so there is not a lot of distraction in the background.我喜欢使用在主体上裁切得很近的图像,因此背景中没有太多干扰。 You'll also want to make sure you're not going to have type across your subject's face, so choose an image that has white space across the top such as a nice clear sky or white backdrop.您还需要确保不会在被摄对象的面部上打过字,因此请选择顶部具有空白区域(例如,晴朗的天空或白色背景)的图像。 Note: If you don't have an image that extends with extra white space try adding a layer with a block of color so you can put text over it.注意:如果您的图像没有多余的白色空格,请尝试添加带有色块的图层,以便在其上放置文本。
步骤1.调整画布大小/裁剪照片.
第一步是调整画布大小或裁剪照片。 对于此示例,我将创建一个最终尺寸为5.5×8.5的迷你杂志模板。 我将所有模板设计为可在McKenna Pro上打印,因为它们是我制作相册和市场营销手册的首选实验室。 您需要与您的打印机联系,以了解他们希望您上传的文件大小。 例如,即使认为该杂志的最终尺寸将为5.5×8.5,我也需要上传5.627×8.75,以便在打印机上修整边缘。 如果您要创建小册子的.pdf格式以通过电子邮件发送给客户,或者只是想将您的杂志上传到issuu,flipsnack或magcloud之类的数字网站,则无需担心边界问题,除非有人将从这些站点购买印刷版。 继续将照片裁剪为适当的尺寸。 此外,您可以添加指南,以便可以看到打印机将在页面上进行剪裁的位置,并确保指南之外没有任何文字或照片的重要部分。 要在图像上创建参考线,请选择 查看–新指南 in Photoshop.在Photoshop中。 As you can see in the sample image there are only guides on three sides of this image.正如您在示例图像中看到的那样,该图像的三个侧面上仅包含向导。 Remember this is a cover and it will only be trimmed on three sides so you don't have to worry about the left side.请记住,这是一个封面,它只会在三个侧面进行修剪,因此您不必担心左侧。
步骤2.选择字体/添加文本。
You'll want to give your cover a title.您需要给封面加上标题。 For this one we'll use Mini Sessions Welcome Guide.对于这一本书,我们将使用“小型会话欢迎指南”。 All fonts I use within my templates are fonts that can be downloaded for free.我在模板中使用的所有字体都是可以免费下载的字体。 You don't necessarily need to purchase a fancy font either.您也不一定需要购买精美字体。 There are a lot of really nice fonts you can download for free.您可以免费下载很多非常好的字体。 You can usually find several lists with free fonts on Pinterest if you do a search.如果进行搜索,通常可以在Pinterest上找到几个带有免费字体的列表。 The fonts used in this example are Capita and Little Days.本示例中使用的字体为Capita和Little Days。 Make sure to center your font according to the guides and not the file.确保根据指南而不是文件将字体居中。 As I mentioned earlier the edges are going to be trimmed and if you center your text based on the full image the text may appear a bit off center.如前所述,边缘将被修整,如果您基于完整图像居中放置文本,则文本可能会显得偏离中心。 Note: You will want to carry the same fonts we used on the cover throughout the brochure to maintain consistency.注意:您将希望携带与手册中封面相同的字体,以保持一致性。
步骤 3。 添加笔触或边框.
If you'd like to add a border on the cover first add a layer to the file.如果要在封面上添加边框,请先在文件上添加一个图层。 In Photoshop select在Photoshop中选择 层-新层 –然后按Enter。 选中该新层后,将椭圆选框工具拖动到图像中心。 注意:如果您要确保边框正确居中,可以在此步骤中创建其他参考线。 选择椭圆选框工具后,转到 编辑–描边 and choose the color of your line.并选择线条的颜色。 For this example I will make it white to keep it neutral, but you can choose a color to match your studio's branding.在本例中,我将其设置为白色以保持中性,但是您可以选择一种颜色以匹配您工作室的品牌。 Make the stroke at least 10 pixels so it will stand out nicely.使笔划至少XNUMX像素,以便突出显示。 If you want to have the effect that the line is going behind the subject simply take the eraser tool and erase along the parts where the line intersects with the subject.如果您想使线条在对象后面,只需使用橡皮擦工具并沿着线条与对象相交的部分进行擦除。 Make sure your layer with the line is selected when you begin using the eraser tool.开始使用橡皮擦工具时,请确保选中带线条的图层。
. 展平并保存.
The final step is to flatten the image and save the file.最后一步是将图像展平并保存文件。 Simply select只需选择 图层–展平图像 in Photoshop.在Photoshop中。 It will ask you to discard hidden layers, select “OK”.它将要求您丢弃隐藏的图层,选择“确定”。 Make sure the image is in RGB mode and not CMYK.确保图像处于RGB模式而不是CMYK。 Save the file as a JPEG at Maximum Quality.以最高质量将文件另存为JPEG。 Now you have a beautiful cover and are on your way to creating your client welcome guide.现在,您有了精美的封面,并且正准备创建客户欢迎指南。
杂志妈妈 sells customizable magazine templates and professionally written marketing articles for photographers to grow their business.出售可定制的杂志模板和专业撰写的营销文章,以供摄影师发展业务。 Her sister site她姐姐的地盘 快门老师 为摄影师销售课程,以为孩子和成人教授基础DSLR摄影课程赚取额外收入。

要免费的模板吗? 在下周一查看我们的帖子 免费的迷你会议模板 下载!


