Featured Products

Is it possible to create HDR images in Photoshop alone, without third party plug-ins or stand alone HRD software? Sure it is! We will show you how to create beautiful HDR images in Photoshop right here. High dynamic range (HDR) photography allows you to capture both highlights and shadows which might be just what you need this Holiday season. There are three phases to creating beautiful HDR photographs: taking shots, merging them into an HDR image, and post-processing HDR.
Shooting for HDR Images
The first step is to set your camera to take bracketed shots which can then be used by Photoshop to create an HDR photo. To do this, you need to shoot in full manual mode or Aperture Priority. Typically, three bracketed shots will give you a nice HDR image but you can work with more shots if you’d like to. I will show you an example of five shots. Your aperture (f-stop) has to stay the same for every shot to make sure your depth of field is always the same. That means that your shutter speed will change for each shot; your camera will do that for you. Check your camera’s owners manual to learn how to set it up for bracketed shooting.
Tips for shooting bracketed photos (BKT):
– Use a tripod
– Switch to manual focus after you pre-focus
– Turn off the vibration reduction (VR for Nikon lenses) or image stabilization (IS for Canon lenses) switch on your lens
– Use a remote shutter release
Creating an HDR Image in Photoshop
Please notice that I work with Photoshop CS5, so my examples might be a bit different from what you see on your screen. Those of you who work more with HDR are probably using plug-ins or stand-alone HDR programs that are much more advanced. However, our goal here is to show what you can do in and with Photoshop alone. Photoshop has a decent HDR tool called HRD Pro, and from my understanding, Adobe has not improved it for CS6.
To merge your bracketed shots in Photoshop, go to File > Automate > Merge to HDR Pro. This command will open a new pop-up window for you to select your bracketed shots. Once you select your shots, Photoshop will process, align and, if necessary, crop your shots before the Merge to HDR Pro window opens; this process may take a few minutes. Once Photoshop merges photos it will open a Merge to HDR Pro window as seen below. At the bottom of this newly opened window you can see which photos have been merged into an HDR image. Take a glance to make sure you merged the correct photos.
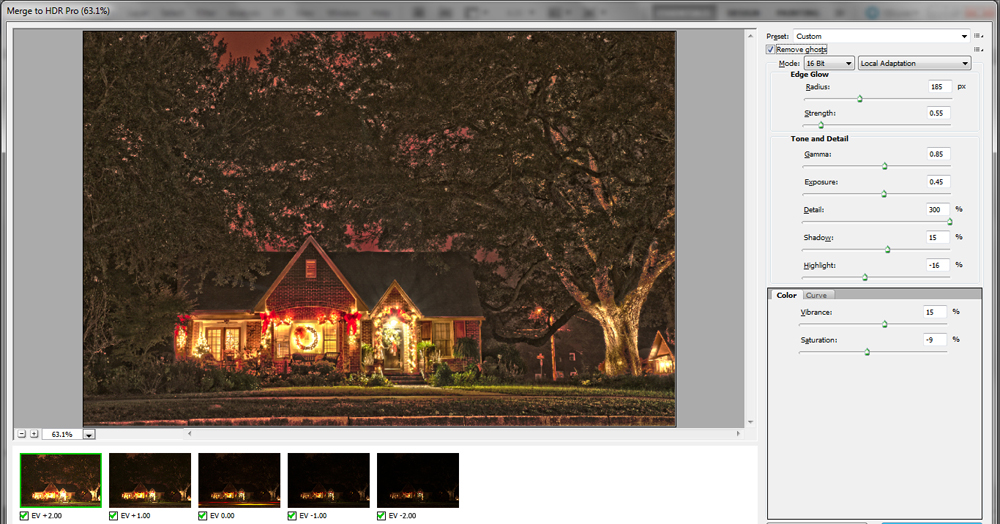
The first thing you will do in this menu is check the Remove Ghosts box. By checking this box, Photoshop will remove all ghosts that are the result of movement such as cloud or leaf movement. In this example it removed a passing cars lights (central photo or EV 0.00).
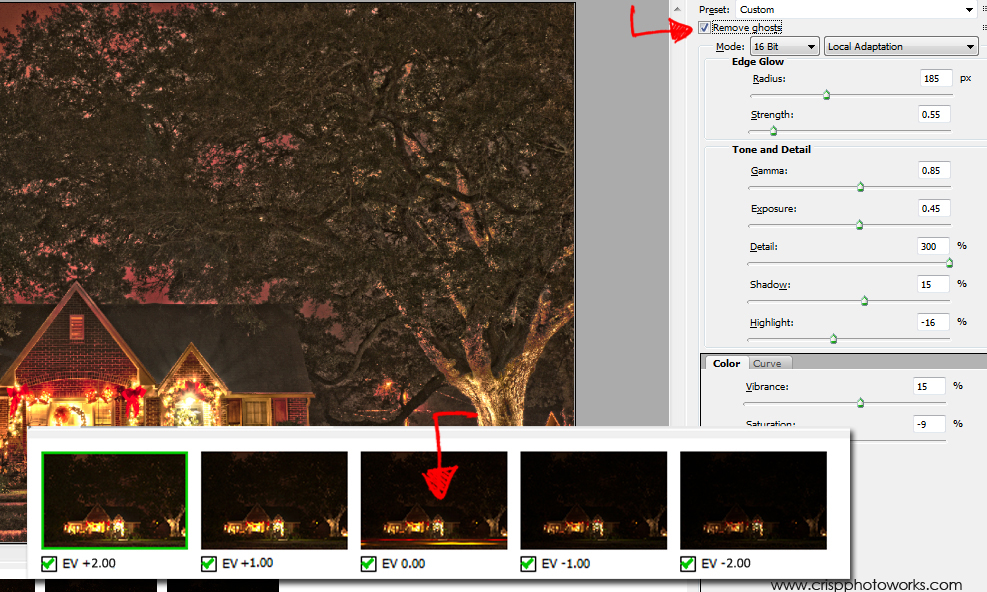
Now, you will spend quite a bit of time in this window trying to see what settings work the best for your photo. Start with selecting Local Adaptation from the pop-up menu. Although Photoshop has a few HRD presets to choose from, they are not all that good. So, make sure you’re working in Local Adaptation mode to get the best result.
I found the settings below to be the best for this particular image and for what I wanted it to look like. Here is an explanation of what each slider in this menu does:
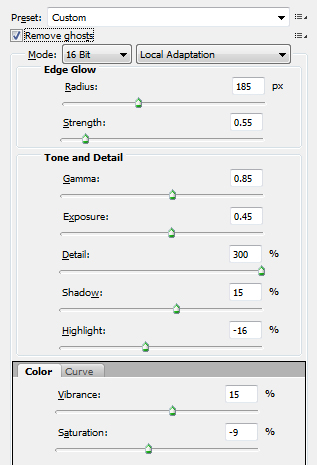
Edge Glow sliders:
- The Radius slider (185 px) controls the size of the edge glow while the Strength slider (55 px) controls its strength. I like to work with increments of five points until I find what I think will work the best, you will eventually find the pace that works for you.
Tone and Detail sliders:
- The Gamma (0.85) slider controls the midtones.
- The Exposure (0.45) slider is pretty self-explanatory and will lighten or darken your photo.
- The Detail (300%) slider is very similar to the Clarity slider in Camera Raw and by changing it, your photo will start looking more like an HDR image.
- The Shadow (15%) slider will make shadow details lighter if you move it to the right.
- The Highlight (-16%) slider acts similar to the Recovery slider in Camera Raw and pulls back the brightest areas of the photo.
Color:
- The Vibrance (15%) slider adds color vibrance.
- The Saturation (-9%) slider actually helps create beautiful old-fashion-looking Christmas HDR photos if you decrease it and increase the vibrance at same time.
Curves:
Finally, you can click on the Curves tab and create the S-curve to add more contrast to your photo. After you find numbers that work the best for your image in Merge to HDR Pro window, click the Open button at the bottom of the screen to open the photo in Photoshop and save it either as Tiff or Jpeg. That completes the second phase of creating beautiful HDRs in Photoshop but as you can tell, it is not that beautiful just yet. We need the third and final step.
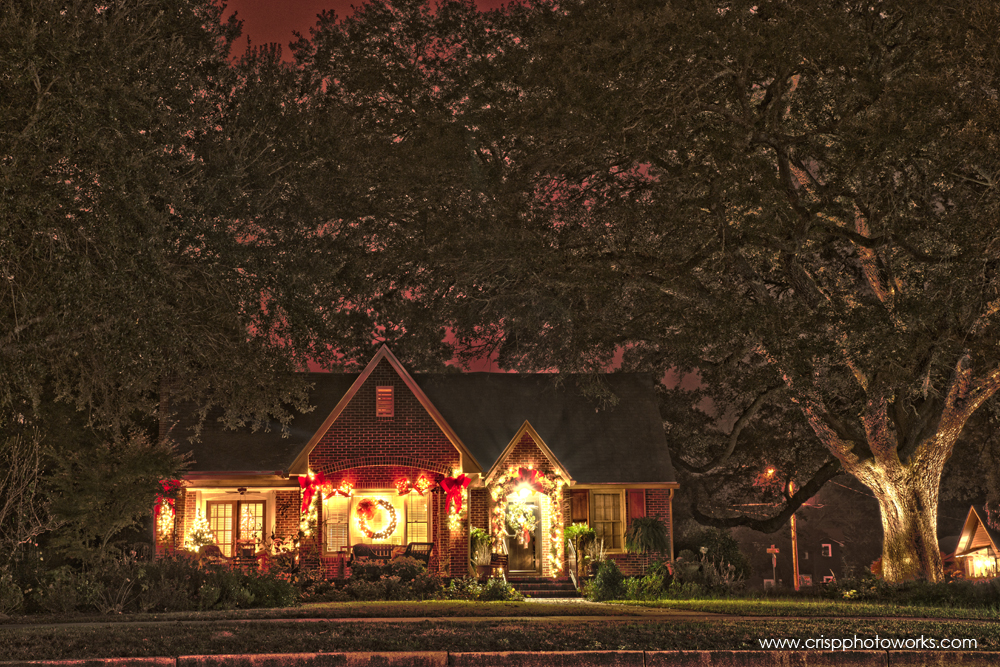
Post-processing HDR in Camera Raw or Lightroom
The third and last phase of creating beautiful HDR images in Photoshop is accomplished in Camera Raw. To open a photo in Camera Raw, Mac users will go to File > Open > Your File. PC users will go to File > Open As > Your File.
The next step is very important: before you click the Open button, change the format to Camera Raw, this way the file will open in Camera Raw. If you prefer use Lightroom, you can open the file in Lightroom and get similar results.
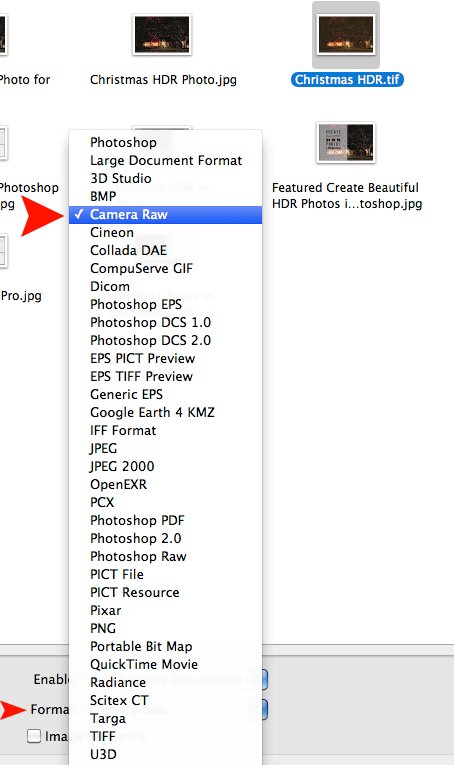
Once in Camera Raw, the editing process is simple. We will change a few settings to finish our image. Again, settings below worked well for this image; you’ll probably need to find which numbers work the best for yours.
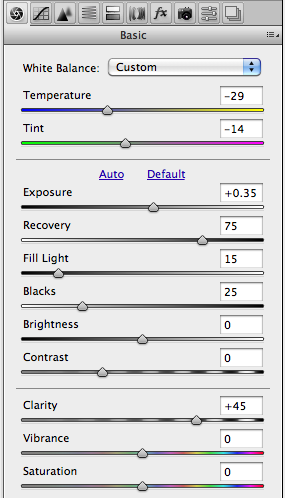
- The Exposure slider (+.035) will brighten your image. My photo was a night shot so I didn’t want to mess with this one too much. It needed to look like a night shot.
- The Recovery slider (75) helped reduce some noise.
- The Fill Light slider (15) brought in some detail in the tree but I didn’t want too much fill light.
- The Blacks slider (25) recovered my blacks.
- The Clarity slider (+45) is the most important one. It brings out a lot of detail and don’t be afraid to increase it.
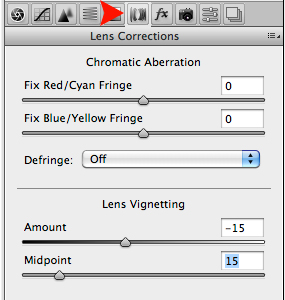
Darkening edges or vignetting, is the final step. To add dark vignetter around this photo, I went to Lens Corrections tab and changed Lens Vignetting settings.
- The Amount slider (-15) was moved to the left which added a nice darker edge to the photo.
- The Midpoint slider (15) extended the darkening inward to open up the image more.
And that’s it! No need for third party plug-ins or stand alone HDR software. HDR can be done in Photoshop alone.
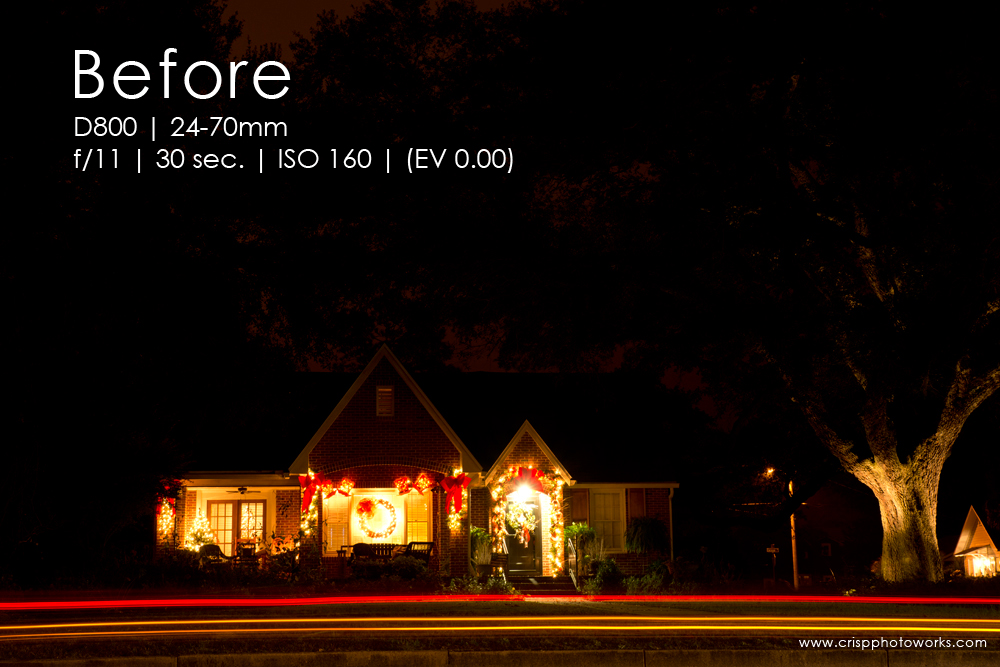
Before Shot: D800 | 24-70mm | f/11 | 30 sec. | ISO 160 | (EV 0.00)
Final Image:
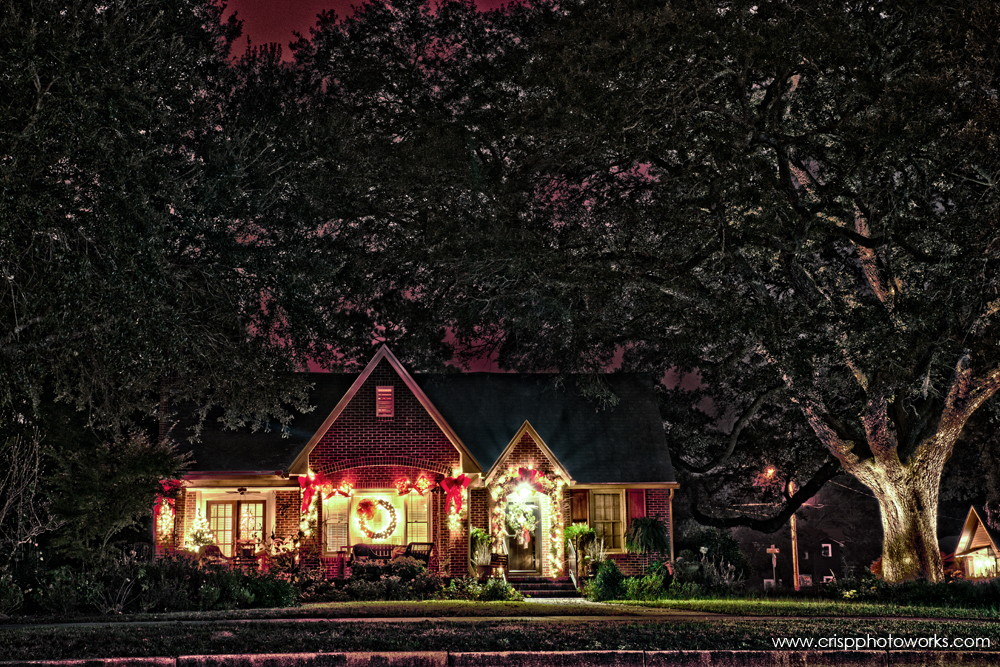
If you want to enhance colors or details even more, check out MCP’s action sets.
Mira Crisp is a pro photographer, photography blogger, and Photoshop addict. When not taking pictures, blogging about them, playing with Photoshop, or running her local photo club, Mira enjoys the life on the Emerald Coast. Visit her blog or connect with her on Facebook.
No Comments
Leave a Comment
You must be logged in to post a comment.











This is beautiful. Is there any way that this can be done in Photoshop Elements?