Featured Products
In a recent Photoshop Curves Online Class, one of my students, Neha Patel, submitted this photo of her daughter. Her little girl is just precious. I worked on it with curves to lightly brighten the skin and add contrast to the image. I also used a selective curves layer to pop the background. After class, I played more and did a few things I can teach in the Color Fixing Online Training, getting rid of the blue in the tree line (this is chromatic aberration) and altering the skin tones.

Here are some of the steps I took, along with what Photoshop actions could be used to achieve similar results.
1. Started by brightening the midtones slightly using a curves adjustment layer below (if using Photoshop actions – you could use Magic Midtone Lifter in Bag of Tricks).
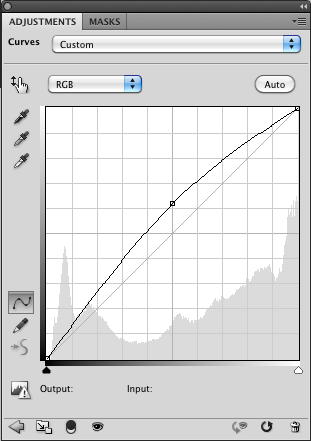
2. Next, I used a similar curve, just up another 1/2 box. Then inverted the mask. I painted with white on the catchlights in her eyes to reveal light. This could be achieved with the Eye Doctor Photoshop action or even the free Touch of Light action.
3. I used another Curves Adjustment Layer to add contrast. If using actions, I would have used Magical Contrast from Bag of Tricks. I did adjust the opacity of this layer to 56% so it was not overly done.
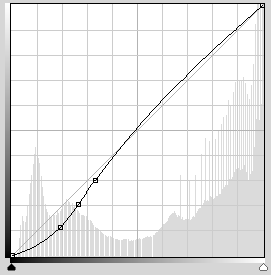
4. Now I used another curves layer to darken the entire photo. Then I inverted the mask. I painted on this “darkness” with a white low opacity brush on the background and elsewhere as desired. You could use Magic Dark or Touch of Dark to achieve this.
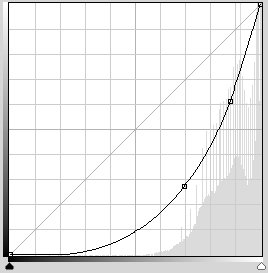
5. Color correction is likely a little too complex for a short tutorial. But I used color curves (where you drop down in the R G B separately) to adjust skin tones. You can also achieve this with Magic See-Saw in Bag of Tricks. If you want to learn this, check out our Color Fixing Online Workshops.
6. Also something I can teach in the color class is getting rid of that nasty blue or purple fringing called Chromatic Aberration. You can also do this, if you know how to tweak the actions, with Color Safe Bleach or Bleach Pen in Bag of Tricks.
7. Lastly, I went back to the background layer, duplicated it, and used the patch tool under her eyes, as explained in this video from 2008. Pardon my less polished video – when this was recorded there was no CS4 or CS5 yet – did I just date myself…. After using the patch tool I adjusted the opacity of that layer.
Here is an alternate crop I tried as well. Either way, she is a cutie!

No Comments
Leave a Comment
You must be logged in to post a comment.
















Jodi,i am intrigued by these simple adjustments. is it possible to make this into a video, or is that just way too much? Just asking…TIA!
how can i print this article. i struggle with curves all the time
Me too!!! I saved it to my favorites 🙂
LOVE it! Very helpful! Thanks.
Wow this is so so helpful! Curves scare me, haha! There’s so much more to it than I originally thought, but this step-by-step process makes it a bit less scary 🙂 Thank you!
Is there a substitute for Curves in PSE ?
Thank you – I am a bit intimidated by curves in PS, but appreciate your willingness to share these steps and help!
Great article! And what a cute girl!
Always love workflow tuts!
Awesome explanations. Thanks so much.
We need a video tut on how to do this in PSE. Pretty please????
Very Helpful!
Thanks for the tutorial. It sounds like most of us are intimidated by curves, but I pinned it and will save it for a rainy day. Fascinating! 🙂
Thanks! Great!
thanks very interesting, and may I say much better in text than as a video, much quicker just to read it!
I haven’t used curves before but this is the second tutorial I have read in the last week and I am amazed at how quick and easy it is to use. Thanks
Hi,Thanks for the information. I find curves indimidating as well, but have used it. I’m confused by your instructions of “I used a similar curve, just up another 1/2 box. Then inverted the mask. I painted with white on the catchlights in her eyes to reveal light.” How do you invert a mask? I think it would have been helpful to see the image as you made each adjustments so we could see the incremental difference. So appreciate your site.Thank you,Linda