Featured Products
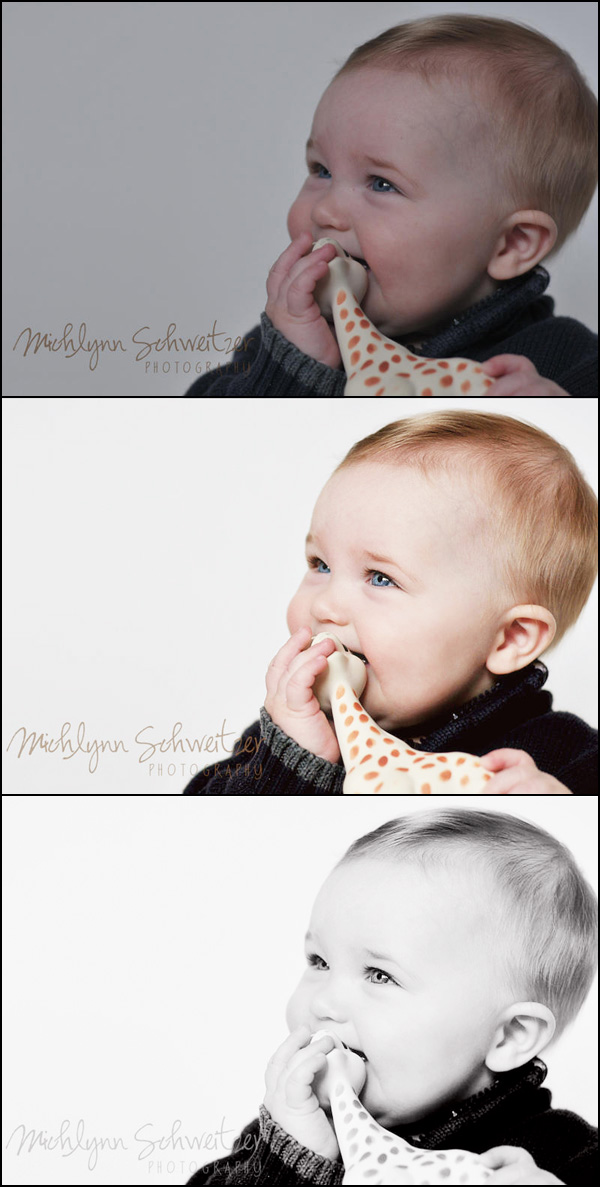
Exposure issues? Well they can happen to both new and more experienced photographers. Michlynn of Michlynn Schweitzer Photography sent in this photo for a Blueprint. Here are the steps taken and Photoshop actions used to go from the under-exposed, low contrast photo, to a portrait.
- Started by using Magic Midtone Lifter from the Bag of Tricks Photoshop actions. I also brought in the white slider at the bottom of curves to exposure for the whites properly. This step can be done in levels as well.
- To adjust exposure more selectively I then used, the free Photoshop action, MCP Touch of Light, on the background and a bit over face to brighten
- Once the exposure was brighter and more accurate, I moved on to the skin. I touched up a few blemishes/markings on skin using the healing brush and patch tools.
- I then used the Powder Your Nose from the Magic skin set – skin smoothing Photoshop action and with a 30% opacity, 30% flow and brushed over cheeks.
- At this point, I adjusted color using Magic See-Saw from the Bag of Tricks color correction Photoshop actions set. I was not happy with the way it effected the background, so I selected the background and masked the background back at 67% (using the mask panel in CS4 – where you change the density). This could also be accomplished by using a brush set at that opacity in CS3 and below.
- Next I defogged the image using the Light Fog Fixer Defog Photoshop action from the Quickie Collection.
- I used the Dreamy Color action from the Quickie Collection but turned off the Over Exposure Fixer layer since it was not needed.
- To enhance the eyes I used the Eye Doctor eye pop Photoshop action. I used the darken the pupil or lash-line to get darker lashes. And then the catchlight and iris layers too.
- Lastly I sharpened using Sharp People Photoshop action from the Quickie Collection.
To do the Black and White, I worked from the color edit (as explained above) and added the following 2 steps:
- Vanilla Ice Cream Black and White photoshop action from the Quickie Collection.
- Under-exposure fixer from the Quickie Collection to bring light to the shadowed areas.
No Comments
Leave a Comment
You must be logged in to post a comment.












Awesome job Jodi, what a difference!
Wow, that looks great! Thanks for sharing your edit with us!!!
great work…i love seeing how you do the details. thx.
holy smokes! you have some mad photoshop skillz! wow!